DSMonitor
UI Health Monitoring Framework — 코드베이스, 스타일, 디자인의 일관성을 정량으로 측정하는 도구입니다.
UI Health Monitoring Framework — a tool that quantifies codebase, style, and design consistency.
DSMonitor 는 측정 도구 입니다 (개선 도구가 아닙니다). 분석 결과는 baseline JSON 과 markdown 리포트, 그리고 인터랙티브 대시보드로 출력됩니다.
이 문서는 한국어 정본을 먼저 두고 그 아래에 영어 정본을 둡니다. 두 정본은 같은 sub-section 순서로 1:1 대응됩니다. English version is in the lower half of this file (see English).
목차 / Table of Contents
처음이신가요? (기획 · 퍼블리싱 등 비개발자) — 2. 설치 → 3. 빠른 시작 → 5. 출력물 위치 → 6. 보고서 활용 네 곳만 순서대로 따라가면 한 바퀴 돌려볼 수 있습니다. 나머지는 필요할 때 찾아보면 됩니다.
개발자 · 세부 설정 — 위에 더해 7. 설정 가이드 이하 심화 레퍼런스까지 함께 보십시오.
| 시작하기 | 심화 레퍼런스 |
|---|---|
| 1. 측정 항목 | 7. 설정 가이드 |
| 2. 설치 | 8. 환경별 설정 예 |
| 3. 빠른 시작 | 9. Figma 매칭 동작 원리 |
| 4. CLI 명령어 | 10. ESLint plugin |
| 5. 출력물 위치 | 11. 사이드카 plugin |
| 6. 보고서 활용 | 12. 환경변수 |
| 13. 트러블슈팅 / FAQ |
지원 기술 스택 / Supported Tech Stacks
DSMonitor 는 다음 기술 스택 조합에서 사용 가능합니다. 신규 도입을 검토하는 단계에서 가장 먼저 이 표로 호환 여부를 확인하시면 됩니다.
| 분야 | 지원 |
|---|---|
| Framework (frontend) | React (Vue / Svelte 등 미지원) |
| Meta-framework | Next.js (App Router / Pages Router), Vite |
| Language | TypeScript, JavaScript (.ts, .tsx, .js, .jsx) |
| Styling | Tailwind, Bootstrap, SCSS, CSS Modules (preset 4종 제공) |
| Design 통합 | Figma (선택) |
| Performance 측정 | Lighthouse (선택) |
위 조합에 해당하지 않는 환경 (예: Vue / Svelte 프로젝트) 은 본 시점 미지원이며, 호환성 검토는 별도로 진행이 필요합니다.
DSMonitor supports the following technology stack combinations. When you are evaluating DSMonitor for a new project, this table is the first place to check compatibility.
| Area | Support |
|---|---|
| Framework (frontend) | React (Vue / Svelte etc. not supported) |
| Meta-framework | Next.js (App Router / Pages Router), Vite |
| Language | TypeScript, JavaScript (.ts, .tsx, .js, .jsx) |
| Styling | Tailwind, Bootstrap, SCSS, CSS Modules (4 presets included) |
| Design integration | Figma (optional) |
| Performance measurement | Lighthouse (optional) |
Stacks not listed above (e.g. Vue / Svelte projects) are currently unsupported; a separate compatibility review is required before adoption.
1. 측정 항목
DSMonitor 는 세 가지 항목을 측정합니다.
| 항목 | 분석 대상 | 출력 |
|---|---|---|
| code | TS / JS / JSX / TSX 코드베이스의 정적 분석 (forbidden class, DS coverage, TS migration, 하드코딩 색상, SCSS 변수 준수율, 마이그레이션 후보, orphan class 등) | dsmonitor/reports/baseline-*.json, dsmonitor/docs/baseline.md |
| figma | DS 파일의 Styles / Components 카운트, 도메인 파일 INSTANCE 의 출처 미상 비율, DS 코드 토큰 매트릭스, DS 컴포넌트 코드 className 매칭 | 위 JSON 의 figma 필드 |
| lighthouse | 페이지별 Performance / Accessibility / Best Practices / SEO 점수 | dsmonitor/lighthouse/reports/YYYY-MM-DD/ |
세 항목 가운데 code 만 필수입니다. figma 와 lighthouse 는 설정에서 빼면 대시보드에서도 자동으로 숨겨집니다.
2. 설치
사전 조건 — Node.js 18 이상과 npm 이 필요합니다 (nodejs.org 에서 LTS 설치). 아래 명령은 모두 프로젝트 루트 폴더에서 연 터미널(macOS 터미널, Windows 명령 프롬프트, VS Code 통합 터미널 등)에서 실행합니다.
npm install --save-dev dsmonitorESLint 규칙을 함께 사용하려면 wrapper 패키지 eslint-plugin-dsmonitor 도 함께 설치합니다. ESLint legacy 설정 (.eslintrc.js) 이 eslint-plugin-{name} 형식의 패키지를 자동으로 찾기 때문에 별도 패키지로 배포되고 있습니다.
npm install --save-dev dsmonitor eslint-plugin-dsmonitor선택 의존성 (실제로 사용하는 경우에만 설치):
| 패키지 | 설치 시점 | 명령 |
|---|---|---|
eslint >= 8 |
dsmonitor ESLint 규칙을 사용하는 경우 | npm install --save-dev eslint |
eslint-plugin-dsmonitor |
dsmonitor ESLint 규칙을 사용하는 경우 | npm install --save-dev eslint-plugin-dsmonitor |
@lhci/cli >= 0.13 |
Lighthouse 측정을 사용하는 경우 | dsmonitor init 실행 시 자동 설치 |
typescript >= 5.0 |
dsmonitor.config.ts 를 직접 작성하는 경우 |
대개 이미 설치되어 있습니다 |
3. 빠른 시작
비개발자 5분 시작 — 설정을 깊이 건드리지 않고 코드 항목만 빠르게 보고 싶다면:
npx dsmonitor init— Figma / Lighthouse 사용 여부를 묻습니다. 잘 모르겠으면 둘 다N으로 두면 됩니다 (나중에 켤 수 있습니다).npx dsmonitor audit --only code— 코드 항목만 측정합니다 (Figma 토큰이나 로그인 설정 없이 바로 돌아갑니다).- 생성된 대시보드를 브라우저로 엽니다 — macOS 는 터미널에서
open dsmonitor/reports/dashboard-*.html, Windows 는start dsmonitor\reports\dashboard-*.html, 또는 파일 탐색기에서dsmonitor/reports/폴더의dashboard-….html파일을 더블클릭합니다.Figma · Lighthouse 까지 포함한 설정은 아래 3.1 ~ 3.3 과 7. 설정 가이드 에서 다룹니다.
3.1 부트스트랩 (dsmonitor init)
npx dsmonitor init→ 인터랙티브 프롬프트로 다음을 묻습니다.
- Lighthouse 측정을 사용하시겠습니까? (Y 를 선택하면
@lhci/cli가 자동 설치됩니다.) - Figma 측정을 사용하시겠습니까? (Y 를 선택하면 설정 파일에서 관련 블록만 토큰 치환합니다.)
→ 자동으로 생성되는 파일:
dsmonitor/dsmonitor.config.ts— 선택한 옵션에 맞춰 토큰이 치환된 설정 파일dsmonitor/.env.local.example— 환경변수 템플릿dsmonitor/reports/.gitkeep— 리포트 디렉토리 placeholderdsmonitor/lighthouse/auth/custom.js— Lighthouse 측정을 사용하고 custom 인증을 고른 경우에만 스켈레톤 생성
직접 디렉토리를 만들 때의 구조는 다음과 같습니다.
my-project/
└── dsmonitor/
    ├── dsmonitor.config.ts        ← presets 와 설정을 직접 작성합니다
    ├── .env.local                 ← gitignored. LIGHTHOUSE_* / FIGMA_API_TOKEN
    ├── .env.local.example
    ├── reports/                   ← 측정 결과 JSON 이 자동으로 출력됩니다
    └── lighthouse/                ← Lighthouse 측정을 사용하는 경우에만
        └── auth/custom.js         ← custom 인증 어댑터를 쓰는 경우에만
3.2 .env.local 작성
.env.local.example 의 키를 실제 값으로 채워서 dsmonitor/.env.local 로 복사합니다.
cp dsmonitor/.env.local.example dsmonitor/.env.local
# 편집기에서 열어 실제 값을 입력합니다.| 변수 | 인증 방식 | 용도 |
|---|---|---|
FIGMA_API_TOKEN |
— | Figma 측정을 사용할 때 필요합니다 (figmaAnalysis = true). Figma → Settings → Personal access tokens 에서 발급합니다. |
LIGHTHOUSE_BASE_URL |
none / basic / custom | Lighthouse 측정 대상 base URL. dev / it / prod 환경을 전환할 때는 이 값 하나만 바꾸면 됩니다. |
LIGHTHOUSE_LOGIN_URL |
basic | 로그인 페이지 경로 (예: /login) 또는 절대 URL. |
LIGHTHOUSE_TEST_ID |
basic | 테스트 계정 ID — basic 어댑터가 읽습니다. |
LIGHTHOUSE_TEST_PW |
basic | 테스트 계정 비밀번호 — basic 어댑터가 읽습니다. |
LIGHTHOUSE_BASIC_SELECTOR_* |
basic (선택) | basic 어댑터의 기본 셀렉터를 덮어씁니다 — ID_INPUT / PW_INPUT / SUBMIT 세 가지. |
.env.local은.gitignore에 반드시 추가하세요 (민감 정보).- custom 어댑터를 사용하는 경우에는 변수를 자유롭게 정의해도 됩니다. 어댑터 본문에서 읽는 변수와
.env.local.example의 안내 줄을 일치시켜 두면 다른 팀원이 알아보기 쉽습니다.
3.3 dsmonitor.config.ts 작성
dsmonitor init 으로 생성된 dsmonitor/dsmonitor.config.ts 에서 다음 항목을 환경에 맞게 채웁니다. 각 필드의 세부 의미는 아래 "설정 가이드" 항목에서 다룹니다.
projectRoot— 보통..으로 둡니다 (dsmonitor/폴더의 한 단계 위).scan.codeRoots/scan.ignore— 분석 대상 폴더와 제외 패턴.figma.designSystemFiles/figma.domainFiles— Figma file URL 을 그대로 입력합니다 (Figma 측정을 쓸 때).lighthouse.baseUrl/lighthouse.pages— Lighthouse 측정 대상 URL 과 페이지 목록.lighthouse.auth— 인증 방식 (none / basic / custom).
4. CLI 명령어
npx dsmonitor audit --all                    # 통합 측정 체인 (code + figma + lighthouse + report + dashboard)
npx dsmonitor audit --all --skip-lighthouse  # 빠른 통합 측정 (Lighthouse 만 건너뜀)
npx dsmonitor audit                          # code + figma 측정 (전체 사이클)
npx dsmonitor audit --only code              # code 만 측정
npx dsmonitor audit --only figma             # figma 만 측정 (기존 baseline JSON 을 base 로 사용)
npx dsmonitor audit --only lighthouse        # Lighthouse 만 측정
npx dsmonitor audit --baseline               # 정식 baseline 모드로 측정 (baseline-YYYY-MM-DD.json)
npx dsmonitor report                         # markdown 리포트만 재생성
npx dsmonitor dashboard                      # dashboard HTML 만 재빌드 (사이드카 plugin 자동 검색)
npx dsmonitor baseline-lint                  # ESLint forbidden class baseline 생성
npx dsmonitor doctor [--json] [--strict]     # 설정 / 환경변수 / path 진단 (0.7.0+)
npx dsmonitor export-migration --frame=<frame-comment> [--ds=<label>]  # Figma frame 안의 instance CSV 출력
공통 옵션:
--config <path>— 설정 파일 경로를 명시합니다. 미지정 시 현재 디렉토리에서 위로 거슬러 올라가며dsmonitor.config.ts또는dsmonitor/dsmonitor.config.ts를 자동으로 찾습니다.--env <path>—.env.local경로를 명시합니다. 미지정 시 설정 파일과 같은 디렉토리에서 찾습니다.--input <path>/--output <path>—report명령에서 입력 / 출력 경로를 명시합니다.
4.1 측정 명령 비교
권장 패턴은 package.json 의 npm scripts 에 다음과 같이 정리해 두는 것입니다.
| 명령 | baseline JSON 생성 | dashboard 갱신 | 사용 시점 |
|---|---|---|---|
npx dsmonitor audit --all --baseline |
✓ | ✓ | 권장 — 한 번의 명령으로 code + figma + Lighthouse + report + dashboard 가 자동으로 이어집니다. |
npx dsmonitor audit --all --baseline --skip-lighthouse |
✓ | ✓ | 빠른 통합 측정 (Lighthouse 만 건너뜀, 약 1–2분). |
npx dsmonitor audit && dsmonitor report && dsmonitor dashboard |
✗ | ✓ | 옛 방식 — 빠르게 측정만 하고 대시보드를 새로 그리고 싶을 때. |
npx dsmonitor audit --baseline && dsmonitor report && dsmonitor dashboard |
✓ | ✓ | 옛 방식으로 baseline 을 갱신. |
npx dsmonitor audit --only code |
✗ | ✗ | code 만 빠르게 측정. |
npx dsmonitor audit --only figma |
✗ | ✗ | figma raw (figma-instances-{date}.json) 만 생성. dashboard 에는 반영되지 않습니다. |
npx dsmonitor audit --only lighthouse |
✗ | ✓ | Lighthouse 만 측정 (약 25분 소요, dashboard 의 lighthouse 부분만 갱신). |
audit --all은 v0.3.0 부터 추가된 통합 체인이며 가장 권장하는 흐름입니다. Lighthouse 사전 준비 (.env.local의LIGHTHOUSE_*환경변수, 필요한 경우 custom 어댑터) 는 Lighthouse 를 사용할 때만 필요합니다.dashboard는 가장 최근의baseline-*.json(prefix 일치) 을 읽어 HTML 을 그립니다.- 더 깊은 흐름 설명은 docs/measurement-flow.md 에 있습니다.
4.2 export-migration 명령
npx dsmonitor export-migration --frame=<frame-comment> [--ds=<label>]특정 Figma frame 안의 instance 단위 마이그레이션 작업 시 활용하는 CSV 를 출력합니다. 디자이너 또는 퍼블리셔가 작업 순서를 잡을 때 쓰는 흐름입니다.
| 항목 | 내용 |
|---|---|
| 동작 | figma-instances-{date}.json 을 읽어서 frame / ds 필터링 + figmaUrl 자동 조립 후 CSV 로 출력합니다. |
--frame=<comment> |
Figma frame 의 comment 또는 name 으로 필터링합니다 (예: --frame=Test-Perform). 정확 일치만 인정합니다. |
--ds=<label> (선택) |
DS label 로 필터링합니다. 기본값은 ds-legacy 이며, ds-new / unmatched / all 도 지정할 수 있습니다. |
| 사전 준비 | npx dsmonitor audit --baseline 으로 figma 측정이 끝나서 dsmonitor/reports/figma-instances-{date}.json 이 생성되어 있어야 합니다. |
| 출력 | dsmonitor/reports/migration/{frame}-{ds}-YYYY-MM-DD.csv (frame 이름과 ds label 은 영문 / 숫자 / 하이픈 / 언더스코어 외 문자가 언더스코어로 치환됩니다). |
| CSV 컬럼 | nodeId / componentName / instanceName / dsLabel / contextPath / figmaUrl — figmaUrl 은 자동 조립되어 클릭으로 바로 진입할 수 있습니다. |
5. 출력물 위치
| 파일 | 내용 |
|---|---|
dsmonitor/reports/baseline-YYYY-MM-DD.json |
측정 결과 (정식 baseline). --baseline 모드로 생성. |
dsmonitor/reports/YYYY-MM-DD.json |
non-baseline (gitignored 권장). |
dsmonitor/reports/figma-instances-YYYY-MM-DD.json |
Figma instance level raw — frame 별 nodeId / componentName / dsLabel / contextPath. |
dsmonitor/reports/dashboard-YYYY-MM-DD.html |
4 탭 dashboard (Summary / Code / Lighthouse / Figma) + plugin 탭 동적 추가. 브라우저로 열어 확인합니다 (macOS open …/dashboard-*.html, Windows start, 또는 탐색기에서 더블클릭). |
dsmonitor/reports/migration/{frame}-{ds}-YYYY-MM-DD.csv |
마이그레이션 CSV (export-migration 출력). |
dsmonitor/reports/plugins/{id}/{date}.json |
사이드카 plugin 의 측정 결과. |
dsmonitor/docs/baseline.md |
markdown 리포트 (자동 생성, 직접 수정 금지). |
dsmonitor/docs/overview-for-stakeholders.md |
비개발자 시야의 간결 요약. |
dsmonitor/lighthouse/reports/YYYY-MM-DD/manifest.json |
LHCI manifest. |
dsmonitor/lighthouse/reports/YYYY-MM-DD/summary.json |
페이지별 4점수 요약. |
dsmonitor/lighthouse/reports/YYYY-MM-DD/*-report.html |
개별 Lighthouse HTML 리포트 (브라우저에서 열어 확인). |
6. 보고서 활용 가이드
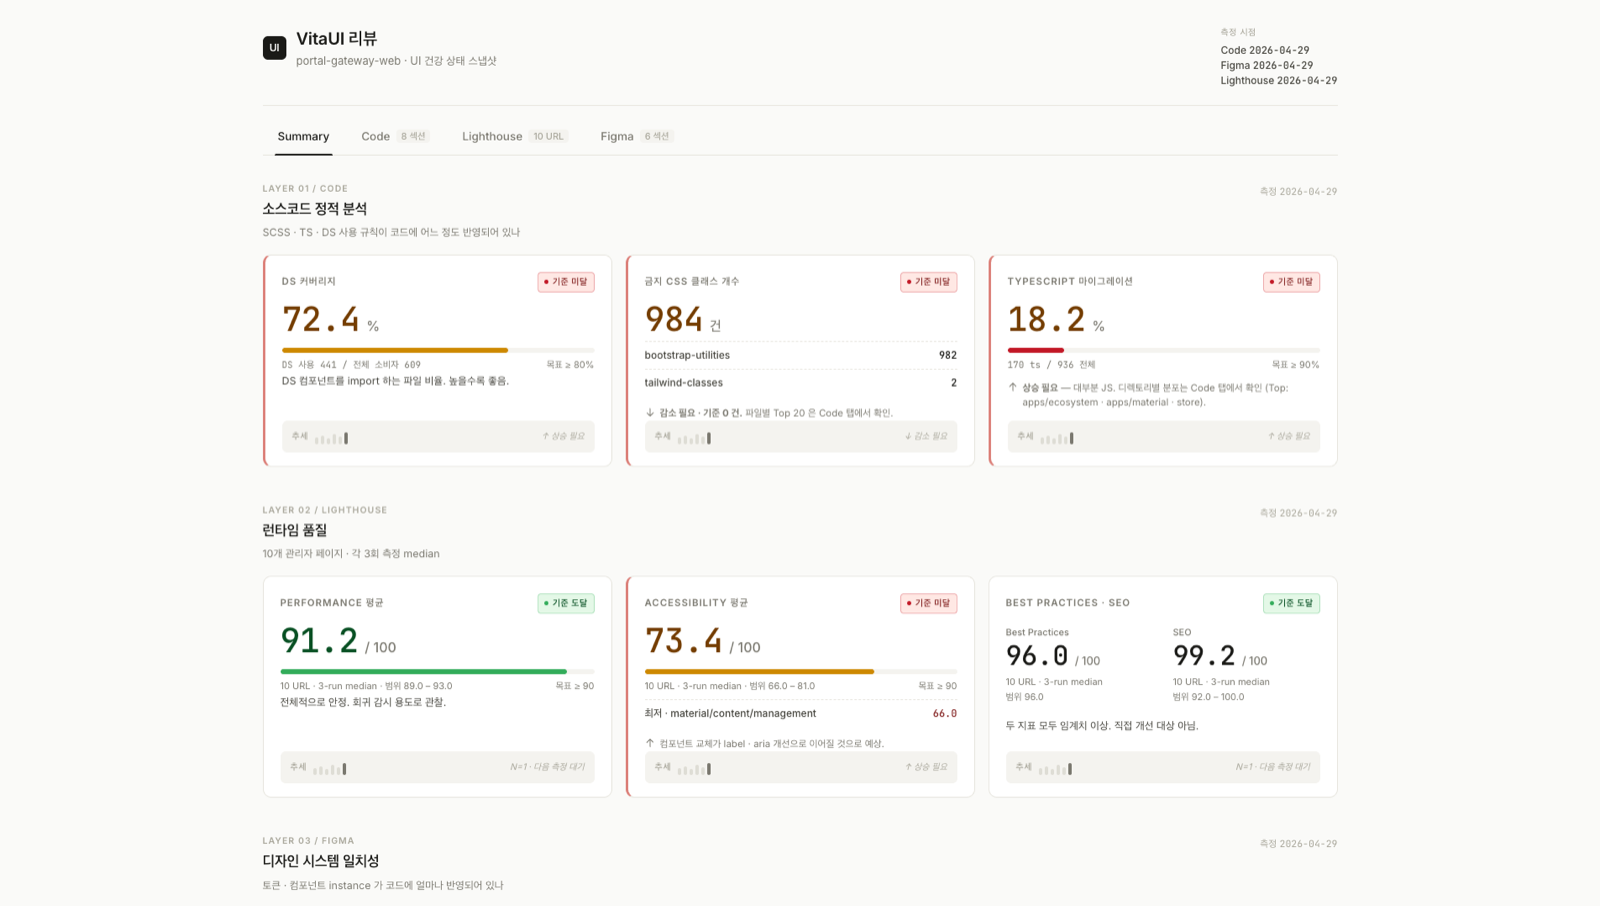
대시보드는 5개 탭으로 구성됩니다 (Figma / Lighthouse 가 꺼져 있으면 해당 탭은 숨겨집니다).
- Summary — 모든 지표의 한 화면 요약. 카드별로 good / warn / bad 색상이 적용됩니다.
- Code — 코드 측정 상세. forbidden class, DS coverage, TS migration, 마이그레이션 후보, orphan class 등.
- Figma — DS 카운트, 토큰 매트릭스, 출처 미상 instance, DS 컴포넌트 매칭, 마이그레이션 우선순위.
- Lighthouse — 페이지별 4점수와 추세.
- Plugin —
dsmonitor/reports/plugins/에 출력된 외부 측정 결과.
markdown 리포트 (dsmonitor/docs/baseline.md) 는 PR / 슬랙 / 사내 위키에 그대로 붙여 넣을 수 있는 형식입니다. 자동 생성이므로 직접 수정하지 마세요. 다음 측정 시 덮어씌워집니다.
비개발자(기획 · 디자인 · 퍼블리싱)라면 dsmonitor/docs/overview-for-stakeholders.md 부터 보십시오. 측정 결과를 코드 용어 없이 간결하게 요약한 문서입니다 (audit 실행 시 자동 생성).
여기부터는 심화 레퍼런스입니다.
dsmonitor init이 이미 동작하는 설정 파일을 만들어 두므로, 처음이라면 아래를 전부 읽지 않아도 됩니다. 대개 경로나 URL 같은 값만 환경에 맞게 손보면 됩니다. §7 의 "(필수)" 표기는 "설정 파일에 그 항목이 있어야 한다"는 뜻이며, "직접 처음부터 써야 한다"는 뜻이 아닙니다.
7. 설정 가이드 — dsmonitor.config.ts 의 모든 필드
설정 파일 한 곳에서 모든 측정 옵션을 제어합니다. 아래는 UIHealthConfig 의 필드를 순서대로 정리한 것입니다.
7.1 projectRoot (필수)
분석 대상의 루트 경로입니다. 설정 파일이 dsmonitor/dsmonitor.config.ts 위치에 있으면 .. 으로 두는 것이 자연스럽습니다.
projectRoot: "..",7.2 projectName (선택)
대시보드 헤더와 푸터에 표시될 이름입니다. 비워 두면 package.json 의 name 을 읽어옵니다. 둘 다 없으면 "Unknown Project" 로 표시됩니다.
projectName: "MyProject",7.3 stylingPolicy (필수)
프로젝트의 스타일링 정책 — 어떤 방식을 허용하고 (allowed), 어떤 방식을 권장하며 (preferred), 어떤 방식을 금지할지 (forbidden) 정의합니다. presets/ 에 네 가지 기본 정책이 들어 있으니 가까운 것을 골라서 import 하면 됩니다 (0.7.3+ ESM 흐름).
import stylingPolicy from "dsmonitor/presets/scss-project.js";
// config 안:
// stylingPolicy,| preset | preferred | allowed | forbidden | 어울리는 프로젝트 |
|---|---|---|---|---|
dsmonitor/presets/scss-project |
scss | SCSS / CSS imports | Bootstrap utility / Tailwind utility | CSS / SCSS 클래스 기반 스타일링 (.css / .scss 모두 포함). Bootstrap / Tailwind 잔재 정리 단계 활용. |
dsmonitor/presets/bootstrap-project |
bootstrap | Bootstrap (utility + component) | Tailwind / inline | Bootstrap 우선. |
dsmonitor/presets/tailwind-project |
tailwind | Tailwind utility | Bootstrap / inline | Tailwind 우선. |
dsmonitor/presets/css-modules-project |
css-modules | CSS Modules import | global utility | CSS Modules 로 모듈화 우선. |
내 프로젝트에 딱 맞지 않을 때는 정책을 직접 작성할 수도 있습니다. 타입은 import type { StylingPolicy } from "dsmonitor" 로 가져옵니다.
7.4 scan (필수)
분석 대상과 제외 패턴을 정의합니다.
scan: {
  codeRoots: ["src", "components", "pages", "app"],
  styleRoots: ["src", "styles"],
  ignore: ["**/node_modules/**", "**/dist/**", "**/.next/**"],
  codeExts: [".ts", ".tsx", ".js", ".jsx"],
  styleExts: [".scss", ".css"],
},codeRoots— 코드 파일을 찾을 디렉토리. Next.js 의 Pages Router (pages) 와 App Router (app) 가 기본값에 모두 포함되어 있습니다.styleRoots— 스타일 파일을 찾을 디렉토리.ignore— glob 패턴으로 무시할 경로. CRA 환경이면**/build/**를, Vite 환경이면**/dist/**를 추가합니다.codeExts/styleExts— 확장자 목록. TS 전용 프로젝트면.js/.jsx를 빼도 됩니다.
7.5 globalStyleSources (필수)
전역으로 허용되는 스타일이 정의된 파일의 glob 패턴입니다. 이 패턴에 잡힌 파일에서 정의된 모든 CSS 셀렉터를 모아 "글로벌 인덱스" 를 만듭니다.
컴포넌트가 사용한 className 중 하나라도 글로벌 인덱스에 있으면 allowedGlobal 로, 하나도 없으면 orphanClass 로 분류됩니다.
globalStyleSources: ["styles/**/*.{scss,css}"],7.6 designSystem (필수)
DS 컴포넌트가 어디에 있는지, 그리고 코드에서 DS 를 어떻게 import 하는지 두 가지를 함께 알려줍니다. officialPaths 와 officialAliases 는 같은 DS 를 서로 다른 "언어" 로 가리키며 보통 값이 다릅니다.
designSystem: {
  officialPaths: ["src/components/ds/**"],
  officialAliases: ["@ds/", "@/components/ds/"],
  componentExts: [".tsx", ".jsx"],
},officialPaths— DS 소스가 실제로 위치하는 파일 경로 (projectRoot 기준 glob). 이 경로 안 파일은 마이그레이션 후보 검출 대상에서 제외됩니다. 영향 지표는totals.dsComponentFiles(DS 본체 파일 수) 입니다.officialAliases— 코드에서 DS 를 import 할 때 쓰는 alias prefix (tsconfig paths / webpack alias 등). 상대 경로 import 만 쓰는 환경이라면 빈 배열로 둬도 됩니다. 영향 지표는dsCoverage.filesUsingDs/dsCoverage.coverage(DS 사용 비율) 입니다.componentExts— 컴포넌트 파일로 인정할 확장자.
두 필드의 값이 동일한 경우는 alias 가 없는 환경 (직접 경로 import 만 쓰는 경우) 입니다. 헷갈리지 않게 정리해 두면 officialPaths 는 "파일이 어디에 있나?", officialAliases 는 "import 가 어떻게 쓰이나?" 두 질문에 답한다고 생각하면 됩니다.
7.7 hardcodedValues (필수)
하드코딩된 값을 잡아내는 정규식 묶음입니다.
hardcodedValues: {
  colorPatterns: [
    /#[0-9a-fA-F]{3,8}\b/g,
    /\brgba?\s*\([^)]*\)/g,
    /\bhsla?\s*\([^)]*\)/g,
  ],
  scssVariableUsagePatterns: [
    /\bvar\s*\(\s*--[\w-]+/g,
    /\$[\w-]+/g,
  ],
  scssVariableDefFiles: [],
},colorPatterns— 하드코딩된 색상을 찾는 정규식.scssVariableUsagePatterns— 변수 참조를 찾는 정규식 (CSSvar()+ SCSS$).scssVariableDefFiles— 하드코딩 검출에서 제외할 변수 정의 원본 파일. Tailwind 환경에서app/globals.css의@theme색상이 noise 로 잡힐 때 여기에 넣어 둡니다.
7.8 migrationTargets / migrationMinClassLength (필수)
native HTML 태그를 어떤 DS 컴포넌트로 대체할지 매핑하는 표입니다. dsmonitor 는 이 표를 보고 "native 태그가 그대로 쓰이는 자리" 중 마이그레이션 후보를 추출합니다.
migrationTargets: {
  Button: {
    aliases: ["@/components/ds/Button"],
    nativeTags: ["button"],
  },
  Input: {
    aliases: ["@/components/ds/Input"],
    // 일반 텍스트 / 숫자 input 은 type 무관 매칭 (모든 <input>).
    nativeTags: ["input", "textarea"],
  },
  // 0.6.0 (W): input[type=...] 같은 attribute 매칭을 위해 객체 형식도 허용합니다.
  Checkbox: {
    aliases: ["@/components/ds/Checkbox"],
    nativeTags: [{ tag: "input", type: "checkbox" }],
  },
  Radio: {
    aliases: ["@/components/ds/Radio"],
    nativeTags: [{ tag: "input", type: "radio" }],
  },
  Switch: {
    aliases: ["@/components/ds/Switch"],
    nativeTags: [{ tag: "input", type: "checkbox" }],
  },
},
migrationMinClassLength: 3,- key (예:
Button) — 리포트와 대시보드에 표시되는 이름. 보통 컴포넌트 파일명이나 named import 이름과 같게 적습니다. aliases— 해당 컴포넌트의 import 경로 (또는 그 prefix). 0.6.1 부터는 alias 가 일치하는 import 중에서도 named import 이름이 key 와 정확히 같을 때만 해당 컴포넌트를 "이미 사용 중" 으로 인정합니다. 예를 들어import { Button } from "@/laon-web-ui"만 있는 파일에서<input>을 발견하면, Button 은 후보에서 제외되지만 Input 은 마이그레이션 후보로 잡힙니다. namespace import (import * as Ui from "...") 와 default import 는 어느 컴포넌트인지 정확히 알 수 없어 옛 동작 (alias 매칭만으로 후보 제외) 을 그대로 유지합니다.nativeTags— 이 컴포넌트로 대체 가능한 native HTML 태그 목록입니다. 두 가지 형식을 함께 쓸 수 있습니다.- string 형식 (예:
"button") — tag 이름만 비교합니다. type attribute 와 무관하게 매칭됩니다. - 객체 형식 (예:
{ tag: "input", type: "checkbox" }, 0.6.0+) — tag 이름이 같고type도 정확히 일치할 때만 매칭됩니다.<input type="checkbox">만 잡고 일반<input type="text">는 잡지 않으려는 경우에 사용합니다.type을 생략하면 string 형식과 동일하게 동작합니다.
- string 형식 (예:
migrationMinClassLength— 이 길이 미만의 className 은 후보에서 제외됩니다. 기본값 3 이면btn,nav같은 짧은 클래스는 포함되고, 4 로 올리면 더 보수적으로 줄어듭니다.
옛
nativeTags: ["input"]형식 (0.5.x 까지) 의 설정은 0.6.0 에서도 그대로 작동합니다. 검출 결과의 의미를 바꾸지 않은 호환 변경입니다.
7.8.1 migrationCandidates.excludeOfficialPaths (0.7.2+)
DS 본체 안에서 자연스럽게 쓰이는 native HTML (예: Button.tsx 가 내부에서 <button> 을 사용하는 케이스) 이 마이그레이션 후보로 잘못 잡히는 false positive 를 정정하는 옵션입니다.
migrationCandidates: {
  excludeOfficialPaths: true, // default (0.7.2+)
},true(default) —designSystem.officialPaths에 매치되는 파일을 마이그레이션 후보 검출에서 자동 제외합니다.scan.ignore에 DS 폴더를 따로 추가하지 않아도 됩니다. 0.7.2 부터 옛 prefix 매칭이 glob-aware 매칭으로 정정되어["src/laon-web-ui/**"]같은 glob 표기도 의도대로 동작합니다.false— 0.7.1 까지의 옛 동작입니다.officialPaths안 파일도 후보 검출 대상에 들어갑니다. DS 본체 자체의 native HTML 패턴을 그대로 보고 싶을 때만 사용하세요.
scan.ignore 와의 차이:
| 옵션 | 영향 범위 |
|---|---|
scan.ignore |
모든 측정에서 제외 — 파일 walk 자체에서 건너뜀. |
migrationCandidates.excludeOfficialPaths |
마이그레이션 후보 검출에서만 제외. totals.dsComponentFiles 같은 DS 본체 지표는 계속 잡힙니다. |
0.7.1 까지
officialPaths: ["src/laon-web-ui/**"]처럼 glob 표기를 적은 환경에서는 매칭이 항상 실패해서 DS 본체 파일이 후보로 잡혔습니다. 0.7.2 부터 본 글로브 표기도 자연스럽게 인식되며 defaulttrue가 함께 적용됩니다 — 따라서 옛 후보 숫자가 줄어들 수 있습니다 (의도된 정정). 옛 동작이 필요하면excludeOfficialPaths: false로 명시하세요.
7.9 framework (필수)
코드 분석에 사용할 framework 어댑터를 고릅니다. 현재는 "react" 만 지원합니다 (Vue / Svelte 어댑터는 향후 추가 예정).
framework: { id: "react" },7.10 metrics (필수)
지표별 on / off 토글입니다. 프로젝트 상황에 맞지 않는 지표는 false 로 두면 대시보드에서도 숨겨집니다.
metrics: {
  tsMigration: true,
  dsCoverage: true,
  migrationCandidates: true,
  stylingDistribution: true,
  hardcodedColors: true,
  scssVariableCompliance: true,
  figmaAnalysis: false,
},tsMigration— TS / JS 비율을 잽니다. 순수 TS 프로젝트면false가 자연스럽습니다.dsCoverage— DS 컴포넌트를 사용하는 파일 비율.migrationCandidates—migrationTargets표를 활용한 마이그레이션 후보 검출.stylingDistribution— 스타일링 방식 분포 (allowed / forbidden / preferred 비율).hardcodedColors— 하드코딩된 색상 카운트.scssVariableCompliance— SCSS 변수 사용 / 하드코딩 비율. Tailwind 환경에서는 변수 사용이 0 에 가까워 의미가 없으므로false권장.figmaAnalysis— Figma 측정 on / off.true로 두려면figma필드와FIGMA_API_TOKEN환경변수가 함께 필요합니다.
7.11 figma (선택)
Figma 측정 설정입니다. metrics.figmaAnalysis = true 일 때만 실제로 사용됩니다.
figma: {
  validationLevel: "lite",
  designSystemFiles: [
    {
      url: "https://www.figma.com/design/AAAAA/Design-System",
      label: "ds-new",
      primary: true,
    },
  ],
  domainFiles: [
    {
      label: "domain-a",
      pages: [
        { url: "https://www.figma.com/design/BBBBB/Domain-A?node-id=2-2", comment: "계정관리" },
      ],
    },
  ],
  unknownInstances: {
    topN: 20,
    allowUnknownSource: true,
  },
  codeTokens: {
    parsers: [
      { type: "scss", files: ["styles/tokens.scss"] },
      // 0.6.0 (R): 신규 파서 2종.
      // Tailwind v3 (config 기반) — tailwind.config.{js,ts} 의 theme 토큰 추출.
      { type: "tailwind", config: "tailwind.config.ts" },
      // CSS variables — `--*` 정의가 들어 있는 CSS 파일. Tailwind v4 의
      // `@theme { --color-primary-500: ...; }` 도 본 파서로 커버됩니다.
      { type: "cssVariables", files: ["src/app/globals.css"] },
    ],
  },
},validationLevel— 현재는"lite"만 지원합니다. Variables API 는 Enterprise plan 이 있어야 호출 가능하기 때문에 Styles + Components 카운트만 측정합니다.designSystemFiles— DS 파일 목록. 각 항목은{ url, label, primary?, comment? }형태로 적습니다. DS 가 2개 이상이면 정확히 1개에primary: true가 필수입니다 (상세 규칙은 7.11.1 참고).domainFiles— 실제 UI 시안 파일 목록. 패턴 A / B / C 세 가지로 작성할 수 있습니다 (7.11.2 참고).unknownInstances.topN— "출처 미상 Instance" 상위 몇 개까지 노출할지.unknownInstances.allowUnknownSource— 외주 옛 DS 등 미등록 출처도 결과에 포함할지.codeTokens.parsers— 코드 토큰 파서 설정 배열입니다. 빈 배열로 두면 토큰 매트릭스의 code 컬럼 카운트가 0 으로 잡힙니다. 지원 파서는 다음 세 가지입니다 (필요한 만큼 함께 등록할 수 있습니다).{ type: "scss", files: [...] }— SCSS / CSS 변수 + SCSS map +@each동적 emit.:root { --name: value; }형식과 SCSS map ($light-theme: (...)+@each ... in $map) 두 가지 모두 처리합니다.{ type: "cssVariables", files: [...] }(0.6.0+) — 순수 CSS 파일의--*정의만 추출합니다. selector (:root,.dark,[data-theme=...]) 안에 있든 밖에 있든 동일하게 잡습니다. Tailwind v4 의@theme {...}디렉티브도 본 파서로 커버됩니다.{ type: "tailwind", config: "...", categories?: [...] }(0.6.0+) — Tailwind v3 의tailwind.config.{js,cjs,mjs,ts}를 동적 import 해theme/theme.extend의 nested 값을 dot-path 로 flatten 합니다 (예:colors.primary.500,spacing.4).categories를 생략하면["colors", "spacing", "fontSize", "borderRadius"]가 기본값입니다. 빈 배열을 넘기면theme의 모든 top-level 키를 시도합니다.
서로 다른 파서에서 동일한 이름이 나오면 등록 순서가 빠른 쪽이 우선이며, 이후 등장은 무시됩니다 (code 컬럼 카운트는 항상 0 또는 1).
자동 감지와 진단 (0.7.0+)
dsmonitor init은 cwd 기준으로 흔한 path 들을 탐색해 default 를 채워 줍니다. 감지된 경우 활성 entry, 감지 0건이면 4종 / 4위치를 주석으로 노출하므로 한 줄만 풀어 쓰면 됩니다.
| 항목 | 후보 (순서대로 첫 발견되는 파일이 default) |
|---|---|
| Tailwind config | tailwind.config.ts / tailwind.config.js / tailwind.config.mjs / tailwind.config.cjs |
| globals.css | src/app/globals.css / src/styles/globals.css / app/globals.css / styles/globals.css / src/index.css / src/styles/main.css |
| SCSS tokens | styles/tokens.scss / src/styles/tokens.scss / styles/variables.scss / src/styles/variables.scss |
- audit 실행 시 지정한 path 가 파일시스템에 없으면
⚠ codeTokens.parsers (...) — file_not_found한 줄이 stderr 로 emit 되고, baseline JSON 의figma.tokenMatrix.warnings에 누적되며, dashboard 의 토큰 매트릭스 sub-section 헤더에 노란 배너로 표시됩니다. - 일괄 진단은
npx dsmonitor doctor— config / 환경변수 / 모든 path 를 한 번에 점검합니다.
7.11.1 DS 파일 라벨과 primary
라벨은 자유 결정입니다 ("v1", "v2", "main", "legacy", "ds-new" 등). 대시보드는 사용자가 정한 라벨을 그대로 보여줍니다.
| 상태 | 처리 |
|---|---|
| DS 1개 (primary 생략) | 자동 primary |
| DS 2개 이상 + primary 0개 | 에러 throw |
| DS 2개 이상 + primary 1개 | 정상 |
| DS 2개 이상 + primary 2개 이상 | 에러 throw |
0.1.x 까지는 ds-new 라벨이 자동으로 primary 였습니다. 0.2.0 부터는 명시 필수입니다.
- { url: "...", label: "ds-new" },
+ { url: "...", label: "ds-new", primary: true },
7.11.2 도메인 파일 입력 패턴
도메인 파일은 세 가지 패턴 중 어느 것으로든 적을 수 있고, 한 도메인 안에서 패턴 B 와 C 를 섞어도 됩니다 (모든 URL 이 같은 file 에 속하는지 자동으로 검증합니다).
// 패턴 A — 파일 전체 측정 (archive 페이지가 섞여 있지 않을 때 적합)
{
  label: "domain-a",
  url: "https://www.figma.com/design/AAAAA/Domain-A",
  comment: "파일 전체 측정",
}

// 패턴 B — 특정 페이지 전체 측정
{
  label: "domain-b",
  pages: [
    { url: "https://www.figma.com/design/BBBBB/Domain-B?node-id=2-2", comment: "계정관리" },
    { url: "https://www.figma.com/design/BBBBB/Domain-B?node-id=3-1", comment: "권한설정" },
  ],
}

// 패턴 C — 페이지 안의 특정 frame 만 측정
{
  label: "domain-c",
  pages: [
    {
      comment: "대시보드",
      frames: [
        { url: "https://www.figma.com/design/CCCCC/Domain-C?node-id=100-5", comment: "메인위젯" },
        { url: "https://www.figma.com/design/CCCCC/Domain-C?node-id=100-10", comment: "상단요약" },
      ],
    },
  ],
}
URL 은 Figma 의 "Copy link" 결과를 그대로 붙여 넣으면 됩니다. fileKey 를 손으로 추출할 필요가 없고, URL 안의 node-id=2-2 와 REST API 의 2:2 사이 변환도 도구가 알아서 처리합니다.
7.12 lighthouse (선택)
Lighthouse 측정 설정입니다.
lighthouse: {
  baseUrl: process.env.LIGHTHOUSE_BASE_URL ?? "http://localhost:3000",
  pages: [
    { path: "/", name: "Home" },
    { path: "/dashboard", name: "Dashboard" },
  ],
  runs: 3,
  auth: { type: "none" },
  advanced: {
    settings: { skipAudits: ["uses-http2"] },
  },
},baseUrl— 측정 대상의 base URL. 환경을 전환할 때는 이 값 하나만 바꾸면 됩니다. 미지정 시process.env.LIGHTHOUSE_BASE_URL ?? "http://localhost:3000"가 fallback 입니다.pages— 측정 대상 페이지 목록. 각 항목은{ path, name? }. 빈 배열이면["/"]가 fallback 입니다.runs— URL 1개당 측정 반복 수. 기본값 3 (대표값을 median 으로 뽑기 위함). 1 로 두면 빠르지만 대표성이 약해집니다.auth— 인증 방식. 상세 옵션은 7.12.1 참고.advanced— LHCIci.collect.settings에 deep-merge 되는 untyped passthrough. 흔한 활용 예:skipAudits: ["uses-http2"]— 사내망에서 자주 빼는 옵션.chromeFlags: ["--no-sandbox"]— Docker / CI 환경.throttlingMethod: "provided"— 외부 throttle 을 쓰는 경우.screenEmulation: { ... }— mobile / 다른 viewport.formFactor: "mobile"— 기본 desktop 을 모바일로 전환.
기본 LHCI 옵션은 dsmonitor 가 다음 값들을 하드코딩으로 inject 합니다 (overrides 는 advanced 로 가능합니다).
preset: "desktop"/formFactor: "desktop"/screenEmulation: 1350×940onlyCategories: ["performance", "accessibility", "best-practices", "seo"]disableStorageReset은auth.type !== "none"일 때 자동으로true가 됩니다 (어댑터가 심은 세션 / JWT 가 측정 사이에 유지되도록).
7.12.1 Lighthouse 인증 방식
lighthouse.auth 는 세 가지 중 하나를 고르는 discriminated union 입니다.
// 1. 인증 없음 — 공개 사이트
auth: { type: "none" }

// 2. ID / PW form login — dsmonitor 내장 어댑터
auth: {
  type: "basic",
  loginUrl: "/login",
  selectors: {
    idInput: "input[type='email']",   // 기본 추론 — 명시 시 우선
    pwInput: "input[type='password']",
    submit: "button[type='submit']",
  },
}

// 3. custom 어댑터 — 자유 본문
auth: {
  type: "custom",
  adapter: "./lighthouse/auth/custom.js",
}- none —
LIGHTHOUSE_BASE_URL만 필요합니다. 로그인 단계 없이 바로 측정합니다. - basic — dsmonitor 가 함께 배포하는
lighthouse/auth/basic-form-login.js를 사용합니다. 환경변수로LIGHTHOUSE_LOGIN_URL/LIGHTHOUSE_TEST_ID/LIGHTHOUSE_TEST_PW를 읽고, selector 는 자동 추론합니다. 사이트 DOM 이 다르면LIGHTHOUSE_BASIC_SELECTOR_ID_INPUT등 환경변수로 덮어쓰거나selectors필드에 직접 적으면 됩니다. - custom — 다단계 인증, OAuth, 세션 쿠키 복원 등 자유 흐름이 필요할 때 씁니다.
dsmonitor init에서 custom 을 고르면lighthouse/auth/custom.js스켈레톤이 자동 생성됩니다.
custom 어댑터 인터페이스 (LHCI puppeteerScript 호환 + dsmonitor 확장):
// 필수 — LHCI 호환 (각 측정 URL 진입 전에 호출됨)
module.exports = async (browser, context) => {
  // 로그인 / 세션 복원 / 헤더 주입 등 자유 본문
};

// 선택 — summary.json 에 메타데이터 추가 (run.js 가 require 후 호출)
module.exports.getMetadata = () => ({
  authType: "custom",
  testAccount: process.env.LIGHTHOUSE_TEST_ID || null,
  // 자유 필드
});
auth.type !== "none" 이면 dsmonitor 가 자동으로 disableStorageReset: true 를 넣어 주므로 어댑터가 심은 세션은 페이지 사이에 보존됩니다.
TypeScript 어댑터 작성 (0.7.1+) — dsmonitor 가 export 하는 LighthouseAuthAdapter 타입을 활용하면 IDE 자동 완성과 컴파일 타임 검증을 함께 받을 수 있습니다. puppeteer 의 Browser 타입은 사용자 쪽에서 직접 import 합니다 (dsmonitor 는 puppeteer 를 직접 의존하지 않습니다).
import type { LighthouseAuthAdapter } from "dsmonitor";
import type { Browser } from "puppeteer";

const adapter: LighthouseAuthAdapter<Browser> = async (browser, context) => {
  const pages = await browser.pages();
  const page = pages.length > 0 ? pages[0] : await browser.newPage();
  // 로그인 / 토큰 주입 등 자유 본문.
};

adapter.getMetadata = () => ({ authType: "custom" });

export default adapter;
흔한 인증 시나리오와 예제 (0.7.1+) — docs/auth-adapter-examples/ 에 그대로 복사해서 쓸 수 있는 어댑터 예제가 5종 들어 있습니다.
| 시나리오 | 예제 파일 | 핵심 |
|---|---|---|
| HTTP Basic Authentication | 01-basic-auth.ts |
page.authenticate() 한 줄로 끝. |
| Form login (ID / PW) | 02-form-login.ts |
가장 흔한 패턴 — selector 만 정정하면 작동. |
| SSO (외부 IdP redirect) | 03-sso.ts |
IdP 도메인 redirect chain 추적. |
| JWT 토큰 주입 | 04-jwt-persistence.ts |
로그인 페이지 건너뛰고 localStorage / cookie 주입. |
| OAuth 2.0 code flow | 05-oauth.ts |
authorize → 자격 증명 → consent → redirect_uri. |
전체 안내 (작성 흐름 / 환경변수 패턴 / TypeScript → JavaScript 변환 / dsmonitor doctor 로 검증) 는 docs/auth-adapter-examples/README.md 에 있습니다.
7.13 thresholds (필수)
각 지표의 good / warn 임계값입니다. direction 이 "higher" 면 값이 높을수록 좋고, "lower" 면 낮을수록 좋습니다.
thresholds: {
  dsCoverage: { good: 0.8, warn: 0.5, direction: "higher" },
  tsMigration: { good: 0.7, warn: 0.3, direction: "higher" },
  scssVariableCompliance: { good: 0.9, warn: 0.7, direction: "higher" },
  preferredCompliance: { good: 0.8, warn: 0.5, direction: "higher" },
  hardcodedColors: { good: 20, warn: 50, direction: "lower" },
  forbiddenClassOccurrences: { good: 100, warn: 500, direction: "lower" },
  forbiddenFileRatio: { good: 0.1, warn: 0.3, direction: "lower" },
  componentMatch: { good: 0.7, warn: 0.4, direction: "higher" },
},
componentMatch 는 Figma DS 컴포넌트 코드 className 매칭률에 대한 임계값입니다 (선택, Figma 측정을 쓸 때만 의미).
7.14 softBaseline (선택)
ESLint forbidden class 의 soft baseline 을 가시화하는 기능입니다. CI 를 막지 않는 대신, 현재 위반 수를 baseline 과 비교해 출력만 합니다.
softBaseline: {
  path: "lint-baseline.json",
},path— soft baseline JSON 파일의 경로 (설정 파일 기준).- 파일이 없으면 "baseline 없음" 메시지만 찍고 종료합니다 (신규 프로젝트 대비).
- 이 파일은
dsmonitor/eslint가 사용하는lint-baseline.json(파일별 심각도 오버라이드) 과는 다른 파일 입니다. 헷갈리지 마세요.
7.15 report (필수)
baseline JSON 의 출력 위치와 prefix 입니다.
report: {
  outputDir: "reports",
  baselineFilenamePrefix: "baseline-",
},
7.16 measurementHistory / reportStatus (선택)
리포트의 시계열 해석을 돕기 위한 메타데이터입니다.
measurementHistory: [
  {
    version: "v0.3.2",
    date: "2026-05-11",
    summary: "README export-migration sub-section 신규 추가",
    notes: [
      "동작 / --frame / --ds flag 사양 정리.",
      "코드 변경 0건.",
    ],
  },
],

reportStatus: {
  completedPhases: [
    { name: "Phase 0.5", completedAt: "2026-05-14", note: "최소 측정 완료" },
  ],
  currentPhase: { name: "Phase 0.6", note: "호환성 검증", startedAt: "2026-05-15" },
  upcomingPhases: [
    { name: "Phase B", note: "Variables / Auto-layout" },
  ],
},measurementHistory— 측정 도구 자체의 변경 이력. 분석 로직이 바뀌어 과거 수치가 재해석될 필요가 있을 때 기록해 두면, 리포트 하단에서 독자가 "왜 이 숫자가 이만큼 바뀌었는지" 를 추적할 수 있습니다.reportStatus— 진행 단계 배지. baseline.md 상단에 렌더링됩니다. 단계 전환은 수동입니다 (upcoming → current → completed).
8. 환경별 설정 예
8.1 Next.js + TypeScript + React + SCSS
import stylingPolicy from "dsmonitor/presets/scss-project.js"; // → config 안: stylingPolicy,
scan: { styleExts: [".scss", ".css"] },
globalStyleSources: ["styles/**/*.{scss,css}"],
hardcodedValues: {
  scssVariableUsagePatterns: [/\bvar\s*\(\s*--[\w-]+/g, /\$[\w-]+/g],
  scssVariableDefFiles: ["styles/variables.scss"],
},
metrics: { scssVariableCompliance: true },
figma: {
  codeTokens: { parsers: [{ type: "scss", files: ["styles/tokens.scss"] }] },
},
8.2 Next.js + TypeScript + React + Tailwind
import stylingPolicy from "dsmonitor/presets/tailwind-project.js"; // → config 안: stylingPolicy,
scan: { styleExts: [".css"] },
globalStyleSources: ["src/app/globals.css", "src/styles/**/*.css"],
hardcodedValues: {
  scssVariableUsagePatterns: [],
  scssVariableDefFiles: ["src/app/globals.css"],
},
metrics: { scssVariableCompliance: false },
figma: {
  codeTokens: { parsers: [] },
},
Tailwind 환경에서 scssVariableCompliance: true 를 그대로 두면 compliance 가 0% 로 나와 무의미한 값이 됩니다. 또한 globals.css 의 @theme 색상 hex 가 colorPatterns 에 잡혀 noise 가 되니 scssVariableDefFiles 에 등록해 두면 좋습니다.
8.3 Next.js + TypeScript + React + CSS Modules
import stylingPolicy from "dsmonitor/presets/css-modules-project.js"; // → config 안: stylingPolicy,
scan: { styleExts: [".scss", ".css"] },
globalStyleSources: ["src/styles/global*.{scss,css}"],
hardcodedValues: {
  scssVariableUsagePatterns: [/\bvar\s*\(\s*--[\w-]+/g],
  scssVariableDefFiles: ["src/styles/variables.css"],
},
metrics: { scssVariableCompliance: false },
figma: {
  codeTokens: { parsers: [] },
},
8.4 Vite + React + Tailwind
scan: {
  ignore: [
    "**/node_modules/**",
    "**/dist/**",   // Vite 출력
    "**/build/**",  // CRA 와 혼합 사용하는 경우
  ],
},
// stylingPolicy / hardcodedValues 등은 8.2 와 동일.
dsmonitor 는 빌드 도구 자체에는 의존하지 않습니다. Vite / CRA / Next.js 어느 환경이든 scan.ignore 로 출력 폴더만 제외해 두면 됩니다.
presets/configs/ 디렉토리에 framework + 스타일 조합별 설정 템플릿 (next-pages-scss.ts, next-app-css-modules.ts, vite-react-tailwind.ts) 도 들어 있어 시작점으로 활용할 수 있습니다.
9. Figma 매칭 동작 원리
dsmonitor 의 Figma 측정은 크게 세 갈래로 이루어집니다.
- DS 파일 카운트 —
designSystemFiles의 각 파일에서 Styles / Components 수를 셉니다. Variables 는 Enterprise plan 의 file_variables:read scope 가 필요해서 현재는 항상null입니다. - 도메인 파일 INSTANCE 매칭 —
domainFiles안의 INSTANCE 노드를 2-hop 매칭합니다 (componentId → stable key → DS label). 매칭에 성공한 INSTANCE 는 출처 분포에 집계되고, 실패한 INSTANCE 는 "출처 미상 (unmatched)" 으로 분류되어 마이그레이션 대상이 됩니다. - DS 코드 매칭 — 두 가지 매칭이 이루어집니다.
- 토큰 매트릭스:
codeTokens.parsers가 뽑은 코드 토큰 (예: SCSS 변수 이름) 과 DS 파일의 Styles 이름을 합쳐서 "code", "primary DS", "non-primary DS" 컬럼으로 교차표를 만듭니다. DS 가 1개면 컬럼이 1개, 2개 이상이면 그만큼 동적으로 컬럼이 늘어납니다. - 컴포넌트 매칭: DS 의 variantGroup 이름 (componentSet.name) 과 standalone component 이름을 분모로 두고, 코드의 className (globalCss 정의 + JSX/TSX 사용 합집합) 과 정확 일치 비교합니다. Figma 이름 = CSS class 동기화 정책을 쓰는 프로젝트에 적합합니다.
- 토큰 매트릭스:
매칭 결과는 다음 네 가지로 분류됩니다.
- both — globalCss 정의 + JSX/TSX 사용 + Figma 매칭 모두 성공 (정상 사용).
- JSX/TSX 만 — JSX/TSX 에서 className 으로 쓰는데 CSS 정의가 없음 (orphan 가능성).
- CSS 만 — CSS 에 정의됐는데 JSX/TSX 에서 미사용 (dead 가능성).
- Figma 만 — Figma 컴포넌트 정의가 있는데 코드에서 className 으로 쓰지 않음 (마이그레이션 우선순위).
10. ESLint plugin
dsmonitor 의 stylingPolicy 를 ESLint 규칙으로도 적용할 수 있습니다.
npm install --save-dev dsmonitor eslint-plugin-dsmonitor// .eslintrc.js
const { fromPolicy } = require("dsmonitor/eslint");
const stylingPolicy = require("./dsmonitor/stylingPolicy");
const policyConfig = fromPolicy(stylingPolicy, {
baselinePath: "./dsmonitor/lint-baseline.json",
});
module.exports = {
extends: ["next/core-web-vitals"],
plugins: policyConfig.plugins,
rules: policyConfig.rules,
overrides: policyConfig.overrides,
};policyConfig.plugins는["dsmonitor"]를 반환합니다. ESLint legacy config 가eslint-plugin-dsmonitor(wrapper 패키지) 를 자동으로 찾습니다.- 규칙:
dsmonitor/no-forbidden-classes—stylingPolicy.forbidden의 패턴에 매치되는 className 을 검출합니다.
ratchet 동작 (점진적 정리):
baselinePathJSON 의files에 등록된 파일 →warn(현재 위반 수준 유지).- 그 외 (신규 파일 포함) →
error(새로 추가하는 코드는 통과 불가). - baseline 파일이 없으면 모든 파일이
error(clean start 모드).
soft lint baseline 갱신용 스크립트도 제공됩니다.
node node_modules/dsmonitor/bin/lint-summary.js          # 현재 위반 수 + baseline 차이 출력 (CI 무관, exit 0)
node node_modules/dsmonitor/bin/lint-update-baseline.js  # baseline 갱신 (--note "메모" 추가 가능)
soft baseline JSON 형식:
{
  "maxWarnings": 123,
  "updatedAt": "2026-05-15T01:23:45.000Z",
  "note": "cleaned up login flow",
  "breakdown": { "bootstrap-utilities": 80, "tailwind-classes": 43 },
  "files": { "src/pages/Login.tsx": 5 },
  "stats": { "rule": "dsmonitor/no-forbidden-classes", "filesWithViolations": 17 }
}
CI 통합 패턴은 docs/eslint-ci-integration.md 에서 확인할 수 있습니다.
11. 사이드카 plugin
이 항목은 확장 기능입니다. 처음이라면 건너뛰어도 됩니다 — dsmonitor 의 기본 측정과는 무관합니다.
DSMonitor 가 직접 측정하지 않는 항목 (단위 테스트 결과, 번들 크기, 접근성 검사 등) 도 약속된 JSON 파일만 출력하면 대시보드에 자동으로 표시됩니다.
- 파일 위치:
dsmonitor/reports/plugins/{id}/{date}.json(id 알파벳순으로 정렬됩니다) - 자동 표시:
npx dsmonitor dashboard실행 시 약속된 폴더를 자동으로 검색합니다. 별도 명령은 필요 없습니다. - 검증: 필수 필드 누락이나 id 불일치, 잘못된 JSON 형식이 있으면 대시보드에 빨간 알림이 표시됩니다.
- 오래된 데이터: 측정 시점이 7일 이상 지난 plugin 은 회색 배지로 표시됩니다.
- plugin 1개당 Summary 탭에 Layer 04+ 한 칸이 자동으로 추가되고, plugin 탭이 동적으로 생성됩니다.
plugin 작성 가이드는 docs/plugin-development.md 에 있습니다.
11.1 plugin 작성하기
dsmonitor 가 측정하지 않는 항목 (단위 테스트, 번들 크기, 접근성 검사 등) 을 대시보드에 자동 표시하려면 다음 형식의 JSON 을 약속된 위치에 출력합니다.
위치: dsmonitor/reports/plugins/{id}/{date}.json
형식 (DSMonitorPluginOutput):
import type { DSMonitorPluginOutput } from "dsmonitor/plugins/types";

const output: DSMonitorPluginOutput = {
  id: "vitest",                          // plugin 고유 id (폴더 이름과 일치)
  label: "단위 테스트",                  // 대시보드 탭 표시 이름
  measuredAt: new Date().toISOString(),
  summary: {
    primary: {
      label: "전체 테스트",
      value: 1234,
      hint: "12.3s",
      status: "good",                     // "good" | "warn" | "bad" | "neutral"
    },
    secondary: [
      { label: "실패", value: 0, status: "good" },
      { label: "skip", value: 7, status: "warn" },
    ],
  },
  details: [
    { name: "auth/login.test.ts", passed: 12, failed: 0, durationMs: 234 },
  ],
  meta: { commit: "abc1234", branch: "main" },
};- dsmonitor 는 plugin 의 실행에 관여하지 않습니다. plugin 은 자체 명령으로 실행되어 JSON 만 출력합니다.
- 검증 실패 (id 불일치 / 필수 필드 누락 / 잘못된 JSON 형식) 는 대시보드에 빨간 알림으로 표시됩니다.
measuredAt이 7일 이상 지난 경우 회색 배지로 표시됩니다.
전체 가이드와 더 깊은 예시는 docs/plugin-development.md 에 있습니다.
12. 환경변수
| 변수 | 용도 |
|---|---|
FIGMA_API_TOKEN |
Figma REST API 호출용 토큰. figmaAnalysis = true 일 때 필요. |
LIGHTHOUSE_BASE_URL |
Lighthouse 측정 대상 base URL. |
LIGHTHOUSE_LOGIN_URL |
basic 인증 — 로그인 페이지 경로 또는 절대 URL. |
LIGHTHOUSE_TEST_ID |
basic 인증 — 테스트 계정 ID. |
LIGHTHOUSE_TEST_PW |
basic 인증 — 테스트 계정 비밀번호. |
LIGHTHOUSE_BASIC_SELECTOR_ID_INPUT |
basic 인증 — 아이디 입력 selector override (선택). |
LIGHTHOUSE_BASIC_SELECTOR_PW_INPUT |
basic 인증 — 비밀번호 입력 selector override (선택). |
LIGHTHOUSE_BASIC_SELECTOR_SUBMIT |
basic 인증 — 제출 버튼 selector override (선택). |
VITAUI_ENV_FILE |
legacy — .env.local 위치를 직접 지정합니다. 0.2.0 부터 deprecated, --env <path> 권장. |
VITAUI_LINT_BASELINE |
legacy — soft lint baseline 경로를 직접 지정합니다. --baseline <path> 권장. |
13. 트러블슈팅 / FAQ
Q. Figma 토큰 매트릭스의 codeCount 가 0 입니다.
A. codeTokens.parsers 에 등록한 path 가 실제 파일과 다른 경우가 흔합니다. 0.7.0 부터 audit 실행 시 stderr 에 ⚠ codeTokens.parsers ... 한 줄로 알리고, baseline JSON 의 figma.tokenMatrix.warnings 에도 누적되며, dashboard 의 "토큰 매트릭스" sub-section 헤더에 노란 배너로 표시됩니다. 빠르게 일괄 점검하려면 npx dsmonitor doctor 를 실행하세요. 그 다음 README §7.11 의 codeTokens.parsers 안내를 참고해 path 를 정정하면 됩니다.
Q. tailwind.config 파일이 자동 감지되지 않습니다 / 확장자가 다릅니다.
A. 0.7.0 의 dsmonitor init 은 cwd 기준으로 tailwind.config.ts → tailwind.config.js → tailwind.config.mjs → tailwind.config.cjs 순서로 첫 발견되는 파일을 default 로 채웁니다. 감지 0건이면 위 4종을 주석으로 노출하므로, 실제로 쓰는 확장자 한 줄만 풀어 쓰면 됩니다. 이미 만들어진 config 라면 codeTokens.parsers 의 { type: "tailwind", config: "..." } 항목을 실제 경로로 정정하세요.
Q. globals.css 위치가 다릅니다.
A. Next.js App Router 는 src/app/globals.css, Pages Router 와 Vite 는 src/styles/globals.css 가 흔합니다. App Router 인데 src/ 가 없다면 app/globals.css 입니다. 0.7.0 의 dsmonitor init 은 이 후보들을 자동으로 탐색합니다. 자동 감지에서 빠진 경로라면 codeTokens.parsers 의 { type: "cssVariables", files: [...] } 와 hardcodedValues.scssVariableDefFiles 를 실제 path 로 정정하세요.
Q. 파서가 정상 작동하는지 어떻게 확인하나요?
A. 다음 세 가지 신호를 보면 됩니다.
npx dsmonitor doctor— config / 환경변수 / 모든 path 를 한 번에 점검합니다.--json으로 CI 통합도 가능합니다.- dashboard 의 "Figma 토큰 매트릭스" sub-section —
code + DS 양쪽 매칭/code 만숫자가 0 이상이면 코드 토큰이 정상 추출되고 있는 것입니다. - audit 실행 시 stderr 출력 — path 부재 / 로드 실패가 있으면
⚠ codeTokens.parsers (...) — file_not_found형식으로 한 줄씩 표시됩니다.
Q. 버전 업그레이드 후 검출 결과가 갑자기 늘었습니다 / 줄었습니다.
A. 최근 두 minor 에서 검출 동작이 한 번씩 바뀌었습니다.
- 0.6.0 (W):
nativeTags에{ tag, type? }객체 형식이 추가되어, Checkbox / Radio / Switch 처럼 type attribute 로 갈라지는 컴포넌트를 별도 검출할 수 있게 되었습니다. 옛 설정은 그대로 작동하지만 객체 형식을 새로 도입하면 검출 항목이 늘 수 있습니다. - 0.6.1 (X):
aliases매칭이 alias prefix + named import 명 조합으로 바뀌었습니다. 옛 흐름이 잘못 누락하던 후보 (alias 만 일치하고 실제로는 다른 컴포넌트만 import 된 케이스) 가 새로 잡혀 마이그레이션 후보 검출 항목이 늘 수 있습니다. - 버전 업그레이드 시 CHANGELOG.md 의 해당 entry 를 함께 확인하세요.
Q. officialPaths 와 officialAliases 의 차이가 뭔가요?
A. 둘은 같은 DS 를 두 가지 "언어" 로 가리킵니다.
officialPaths= DS 소스가 실제로 위치하는 파일시스템 경로 (예:["src/components/ds/**"]). 영향 지표는totals.dsComponentFiles(DS 본체 파일 수) 이며, 이 경로 안 파일은 마이그레이션 후보 검출 대상에서 제외됩니다.officialAliases= 코드에서 DS 를 import 할 때 쓰는 alias prefix (예:["@ds/", "@/components/ds/"]). 영향 지표는dsCoverage.filesUsingDs/dsCoverage.coverage(DS 사용 비율) 입니다.- 두 값이 동일하다면 alias 가 없는 환경 (직접 경로 import 만 쓰는 경우) 입니다.
- 헷갈리지 마세요:
officialPaths는 "파일이 어디에 있나?",officialAliases는 "import 가 어떻게 쓰이나?" 입니다.
Q. DS 본체 파일이 마이그레이션 후보로 잡힙니다.
A. 0.7.2 부터는 migrationCandidates.excludeOfficialPaths 의 default 가 true 라서 designSystem.officialPaths 안 파일이 후보 검출에서 자동 제외됩니다. 0.7.1 까지의 환경이라면 두 가지 선택이 있습니다 — (1) dsmonitor 를 0.7.2 이상으로 업그레이드, (2) 옛 흐름을 유지하고 싶다면 scan.ignore 에 DS 폴더를 추가. 0.7.1 까지는 officialPaths 에 ["src/laon-web-ui/**"] 같은 glob 표기를 적으면 매칭이 항상 실패해서 DS 본체가 후보로 잡혔습니다 — 0.7.2 의 glob-aware 매칭과 default true 조합으로 본 함정이 정정됩니다. 옛 동작을 그대로 두고 싶으면 migrationCandidates: { excludeOfficialPaths: false } 로 명시하세요.
Q. 로그인이 필요한 페이지를 Lighthouse 로 측정하려면 어떻게 하나요?
A. dsmonitor.config.ts 의 lighthouse.auth 를 { type: "custom", adapter: "./..." } 로 두고 어댑터 파일을 작성합니다. 흔한 다섯 시나리오 (HTTP Basic / Form login / SSO / JWT 주입 / OAuth 2.0) 는 docs/auth-adapter-examples/ 에 복사해서 쓸 수 있는 예제가 들어 있습니다. 0.7.1 부터는 import type { LighthouseAuthAdapter } from "dsmonitor" 로 TypeScript 시그니처도 받을 수 있어 IDE 자동 완성과 컴파일 검증이 가능합니다. 상세 작성 흐름은 §7.12.1 과 docs/auth-adapter-examples/README.md 를 참고하세요.
Q. dsmonitor.config.ts 를 찾지 못한다는 에러가 나옵니다.
A. 다음 흐름으로 검색합니다 (현재 디렉토리부터 위로 올라가며).
<dir>/dsmonitor.config.ts<dir>/dsmonitor/dsmonitor.config.ts<dir>/vitaui.config.ts(legacy, 0.2.0 부터 deprecated)<dir>/vitaui/vitaui.config.ts(legacy)
설정 파일이 위 경로에 없으면 npx dsmonitor init 으로 부트스트랩하거나 --config <path> 로 명시 지정합니다.
Q. Lighthouse 측정 시 Chrome 을 찾지 못합니다.
A. @lhci/cli 는 chrome-launcher 가 시스템 Chrome 을 자동으로 찾는 흐름입니다. Chrome / Chromium / Brave 같은 chrome-launcher 호환 브라우저를 사전에 설치해야 합니다.
- macOS:
brew install --cask google-chrome또는 https://www.google.com/chrome/ - Linux (Ubuntu / Debian):
apt-get install google-chrome-stable - Linux (Fedora):
dnf install google-chrome-stable - Windows:
choco install googlechrome(Chocolatey) 또는 직접 다운로드 - Docker:
node:20-bookworm-slim베이스에apt-get install chromium추가 - CI: GitHub Actions
ubuntu-latest는 기본 설치되어 있습니다. Jenkins 는 워커에 사전 설치 필요.
검증 명령:
node -e "console.log(require('chrome-launcher').Launcher.getInstallations())"경로가 하나 이상 나오면 OK, 빈 배열이면 Chrome 이 감지되지 않은 상태입니다.
Q. Tailwind 환경인데 SCSS 변수 준수율이 0% 로 나와 의미가 없습니다.
A. metrics.scssVariableCompliance: false 로 두세요. Tailwind 환경에서는 SCSS 변수 사용이 0 에 가까운 것이 자연스러운 결과이므로 측정 자체를 끄는 것이 맞습니다. 또한 colorPatterns 가 globals.css 의 @theme 색상 hex 를 noise 로 잡을 수 있으니 hardcodedValues.scssVariableDefFiles 에 해당 파일을 등록해 두세요.
Q. dsmonitor 가 Figma INSTANCE 를 unmatched 로 자주 분류합니다.
A. 2-hop 매칭 (componentId → stable key → DS label) 의 두 번째 hop 에 실패한 경우입니다. 흔한 원인:
- DS 파일이
designSystemFiles에 등록되지 않았거나 라벨이 일치하지 않음. - 외주 옛 DS 등 미등록 출처 —
unknownInstances.allowUnknownSource: true로 두면 결과에 함께 포함됩니다. - INSTANCE 가 실제로 detach 되어 component 가 없는 경우 — 이 경우는 정상적인 unmatched 입니다.
Q. ESLint plugin 이 적용되지 않습니다.
A. dsmonitor 와 eslint-plugin-dsmonitor 두 패키지를 모두 설치했는지 확인하세요. ESLint legacy config 는 eslint-plugin-{name} 형식의 패키지를 자동으로 찾기 때문에 wrapper 패키지가 별도로 필요합니다.
용어 풀이
| 용어 | 뜻 |
|---|---|
| baseline JSON | 한 번의 측정 결과를 통째로 담은 기준 파일 (dsmonitor/reports/baseline-<날짜>.json). 대시보드와 리포트가 이 파일을 읽어 그립니다. |
| forbidden class | 스타일링 정책에서 "쓰면 안 된다"고 정한 CSS 클래스 (예: 정리 대상인 Bootstrap · Tailwind 유틸리티). |
| orphan class | JSX/TSX 에서 className 으로 쓰는데 어느 CSS 파일에도 정의가 없는 클래스 (정의 누락 가능성). |
| DS coverage | 디자인 시스템(DS) 컴포넌트를 실제로 import 해 쓰는 파일의 비율. |
| 마이그레이션 후보 | 아직 native HTML 태그(예: <button>)로 남아 있어 DS 컴포넌트로 바꿀 수 있는 자리. |
| 2-hop 매칭 | Figma instance 가 어느 DS 에서 왔는지 두 단계(componentId → 안정 key → DS 라벨)로 추적하는 방식. |
| ratchet | ESLint 에서 기존 위반은 경고로 두고 새 위반만 막아 점진적으로 정리하는 동작. |
| 토큰 매트릭스 | 코드의 토큰(색상 · 간격 등 변수)과 Figma DS 의 Styles 를 교차해 양쪽에 다 있는지 비교한 표. |
14. 더 읽기
- docs/figma-config-guide.md — Figma 설정의 상세 가이드 (DS 파일, 도메인 파일, 마이그레이션 CSV 추출).
- docs/eslint-rules.md — ESLint 규칙 상세와 ratchet 동작.
- docs/eslint-ci-integration.md — CI 통합 패턴.
- docs/lighthouse-ci-integration.md — Lighthouse CI 통합.
- docs/plugin-development.md — 사이드카 plugin 개발 참고 문서.
- docs/auth-adapter-examples/README.md — Lighthouse custom 인증 어댑터 예제 5종 (HTTP Basic / Form login / SSO / JWT 주입 / OAuth 2.0, 0.7.1+).
- docs/measurement-flow.md — 측정 흐름 다이어그램.
- docs/methodology.md — 측정 방법론 (현재 placeholder).
15. 기여자
- chenjingdev — 기획 협업.
- june0-K — 기획 협업.
- servantcdh — plugin 시스템 개발 협업.
16. 라이선스
MIT — LICENSE
DSMonitor (English)
UI Health Monitoring Framework — a tool that quantifies codebase, style, and design consistency.
DSMonitor is a measurement tool (not an improvement tool). Results are emitted as a baseline JSON, a markdown report, and an interactive dashboard.
The Korean reference version sits above this line. Each English sub-section mirrors the matching Korean one.
Table of Contents
New here? (non-developers — planning · publishing) — just follow 2. Installation → 3. Quick Start → 5. Output Locations → 6. Reading the Reports in order for one full pass. Look up the rest when you need it.
Developers · detailed configuration — also read 7. Configuration Guide and the reference sections below it.
1. Measurement Areas
DSMonitor measures three things.
| Area | Targets | Output |
|---|---|---|
| code | Static analysis of TS / JS / JSX / TSX (forbidden class, DS coverage, TS migration, hardcoded colors, SCSS variable compliance, migration candidates, orphan class, etc.) | dsmonitor/reports/baseline-*.json, dsmonitor/docs/baseline.md |
| figma | DS file Styles / Components counts, domain-file INSTANCE unknown-source ratio, DS code token matrix, DS component code className matching | figma field inside the JSON above |
| lighthouse | Per-page Performance / Accessibility / Best Practices / SEO scores | dsmonitor/lighthouse/reports/YYYY-MM-DD/ |
Only code is mandatory. figma and lighthouse are optional — dropping them from the config also hides their tabs in the dashboard.
2. Installation
Prerequisites — you need Node.js 18+ and npm (install the LTS from nodejs.org). Run every command below in a terminal opened at your project root (macOS Terminal, Windows Command Prompt, the VS Code integrated terminal, etc.).
npm install --save-dev dsmonitorTo also use the ESLint rules, install the wrapper package eslint-plugin-dsmonitor. It is published separately so that ESLint legacy config can auto-resolve eslint-plugin-{name}.
npm install --save-dev dsmonitor eslint-plugin-dsmonitorOptional peer dependencies (install only what you actually use):
| Package | When | Command |
|---|---|---|
eslint >= 8 |
Using the dsmonitor ESLint rules | npm install --save-dev eslint |
eslint-plugin-dsmonitor |
Using the dsmonitor ESLint rules | npm install --save-dev eslint-plugin-dsmonitor |
@lhci/cli >= 0.13 |
Using Lighthouse measurement | Auto-installed by dsmonitor init |
typescript >= 5.0 |
Authoring dsmonitor.config.ts |
Usually already installed |
3. Quick Start
Non-developer 5-minute start — to see just the code metrics without diving into configuration:
npx dsmonitor init— it asks whether you use Figma / Lighthouse. If unsure, answerNto both (you can turn them on later).npx dsmonitor audit --only code— measures code only (runs right away, no Figma token or login setup).- Open the generated dashboard in a browser — macOS:
open dsmonitor/reports/dashboard-*.html; Windows:start dsmonitor\reports\dashboard-*.html; or double-click thedashboard-….htmlfile indsmonitor/reports/in your file explorer.For full configuration (including Figma · Lighthouse), see 3.1 – 3.3 below and 7. Configuration Guide.
3.1 Bootstrap (dsmonitor init)
npx dsmonitor initInteractive prompts:
- Use Lighthouse measurement? (Y → auto-install
@lhci/cli) - Use Figma measurement? (Y → token-substitutes the relevant block only)
Auto-generated files:
dsmonitor/dsmonitor.config.ts— config aligned to your prompt answersdsmonitor/.env.local.example— env var templatedsmonitor/reports/.gitkeep— placeholder for the reports directorydsmonitor/lighthouse/auth/custom.js— only when Lighthouse + custom auth is chosen
If you prefer to set it up by hand:
my-project/
└── dsmonitor/
    ├── dsmonitor.config.ts        ← presets and config (authored by you)
    ├── .env.local                 ← gitignored. LIGHTHOUSE_* / FIGMA_API_TOKEN
    ├── .env.local.example
    ├── reports/                   ← measurement JSON output
    └── lighthouse/                ← only when Lighthouse is used
        └── auth/custom.js         ← only when using a custom adapter
3.2 Filling .env.local
Copy the example with real values:
cp dsmonitor/.env.local.example dsmonitor/.env.local
# Open in your editor and enter the real values.| Variable | Auth Type | Purpose |
|---|---|---|
FIGMA_API_TOKEN |
— | Required when figmaAnalysis = true. Generate at Figma → Settings → Personal access tokens. |
LIGHTHOUSE_BASE_URL |
none / basic / custom | Lighthouse target base URL. Change this single value when switching dev / it / prod. |
LIGHTHOUSE_LOGIN_URL |
basic | Login page path (e.g. /login) or absolute URL. |
LIGHTHOUSE_TEST_ID |
basic | Test account ID (read by the basic adapter). |
LIGHTHOUSE_TEST_PW |
basic | Test account password (read by the basic adapter). |
LIGHTHOUSE_BASIC_SELECTOR_* |
basic (optional) | Override default selectors — ID_INPUT / PW_INPUT / SUBMIT. |
- Always keep
.env.localin.gitignore(sensitive material). - For custom adapters, define your own variables. Keep the adapter body and the
.env.local.examplecomments in sync.
3.3 Filling dsmonitor.config.ts
After dsmonitor init writes dsmonitor/dsmonitor.config.ts, fill the entries below. Detailed semantics are in section 7 (Configuration guide).
projectRoot— usually..(the parent ofdsmonitor/).scan.codeRoots/scan.ignore— analysis targets and ignore patterns.figma.designSystemFiles/figma.domainFiles— Figma file URLs (when using Figma measurement).lighthouse.baseUrl/lighthouse.pages— Lighthouse base URL and page list.lighthouse.auth— auth strategy (none / basic / custom).
4. CLI Commands
npx dsmonitor audit --all                    # integrated chain (code + figma + lighthouse + report + dashboard)
npx dsmonitor audit --all --skip-lighthouse  # fast integrated chain (skip Lighthouse)
npx dsmonitor audit                          # code + figma measurement (full cycle)
npx dsmonitor audit --only code              # code only
npx dsmonitor audit --only figma             # figma only (uses an existing baseline JSON as base)
npx dsmonitor audit --only lighthouse        # Lighthouse only
npx dsmonitor audit --baseline               # official baseline mode (baseline-YYYY-MM-DD.json)
npx dsmonitor report                         # regenerate the markdown report
npx dsmonitor dashboard                      # rebuild the dashboard HTML (auto-discovers sidecar plugins)
npx dsmonitor baseline-lint                  # generate the ESLint forbidden class baseline
npx dsmonitor doctor [--json] [--strict]     # diagnose config / env / paths (0.7.0+)
npx dsmonitor export-migration --frame=<frame-comment> [--ds=<label>]
Shared options:
--config <path>— explicit path to the config file. Otherwise dsmonitor walks up from the current directory looking fordsmonitor.config.tsordsmonitor/dsmonitor.config.ts.--env <path>— explicit.env.localpath. Otherwise dsmonitor looks for it next to the config file.--input <path>/--output <path>— input / output paths for thereportcommand.
4.1 Comparing measurement commands
| Command | baseline JSON | dashboard | When to use |
|---|---|---|---|
npx dsmonitor audit --all --baseline |
✓ | ✓ | Recommended — single command runs code + figma + Lighthouse + report + dashboard. |
npx dsmonitor audit --all --baseline --skip-lighthouse |
✓ | ✓ | Fast integrated chain (skip Lighthouse, ~1–2 min). |
npx dsmonitor audit && dsmonitor report && dsmonitor dashboard |
✗ | ✓ | Legacy three-step — quick measure + rebuild. |
npx dsmonitor audit --baseline && dsmonitor report && dsmonitor dashboard |
✓ | ✓ | Legacy three-step with baseline update. |
npx dsmonitor audit --only code |
✗ | ✗ | Code only, fast feedback. |
npx dsmonitor audit --only figma |
✗ | ✗ | Writes figma-instances-{date}.json only; not picked up by the dashboard. |
npx dsmonitor audit --only lighthouse |
✗ | ✓ | Lighthouse only (~25 min; refreshes the Lighthouse section of the dashboard). |
audit --all(v0.3.0+) is the preferred flow. Lighthouse setup is only required when Lighthouse is used.dashboardreads the latestbaseline-*.json(matched by prefix) and renders the HTML.- More flow details: docs/measurement-flow.md.
4.2 export-migration command
npx dsmonitor export-migration --frame=<frame-comment> [--ds=<label>]Exports a CSV of instances within a specific Figma frame — useful as source data for designers / publishers planning new-DS / legacy-DS migrations.
| Field | Description |
|---|