@sendbird/ai-agent-messenger-react-native
React Native
The Delight AI agent Messenger for React Native allows seamless integration of AI-powered messaging features into your React Native application. Follow the steps below to initialize and utilize the SDK effectively.
This guide covers:
Prerequisites
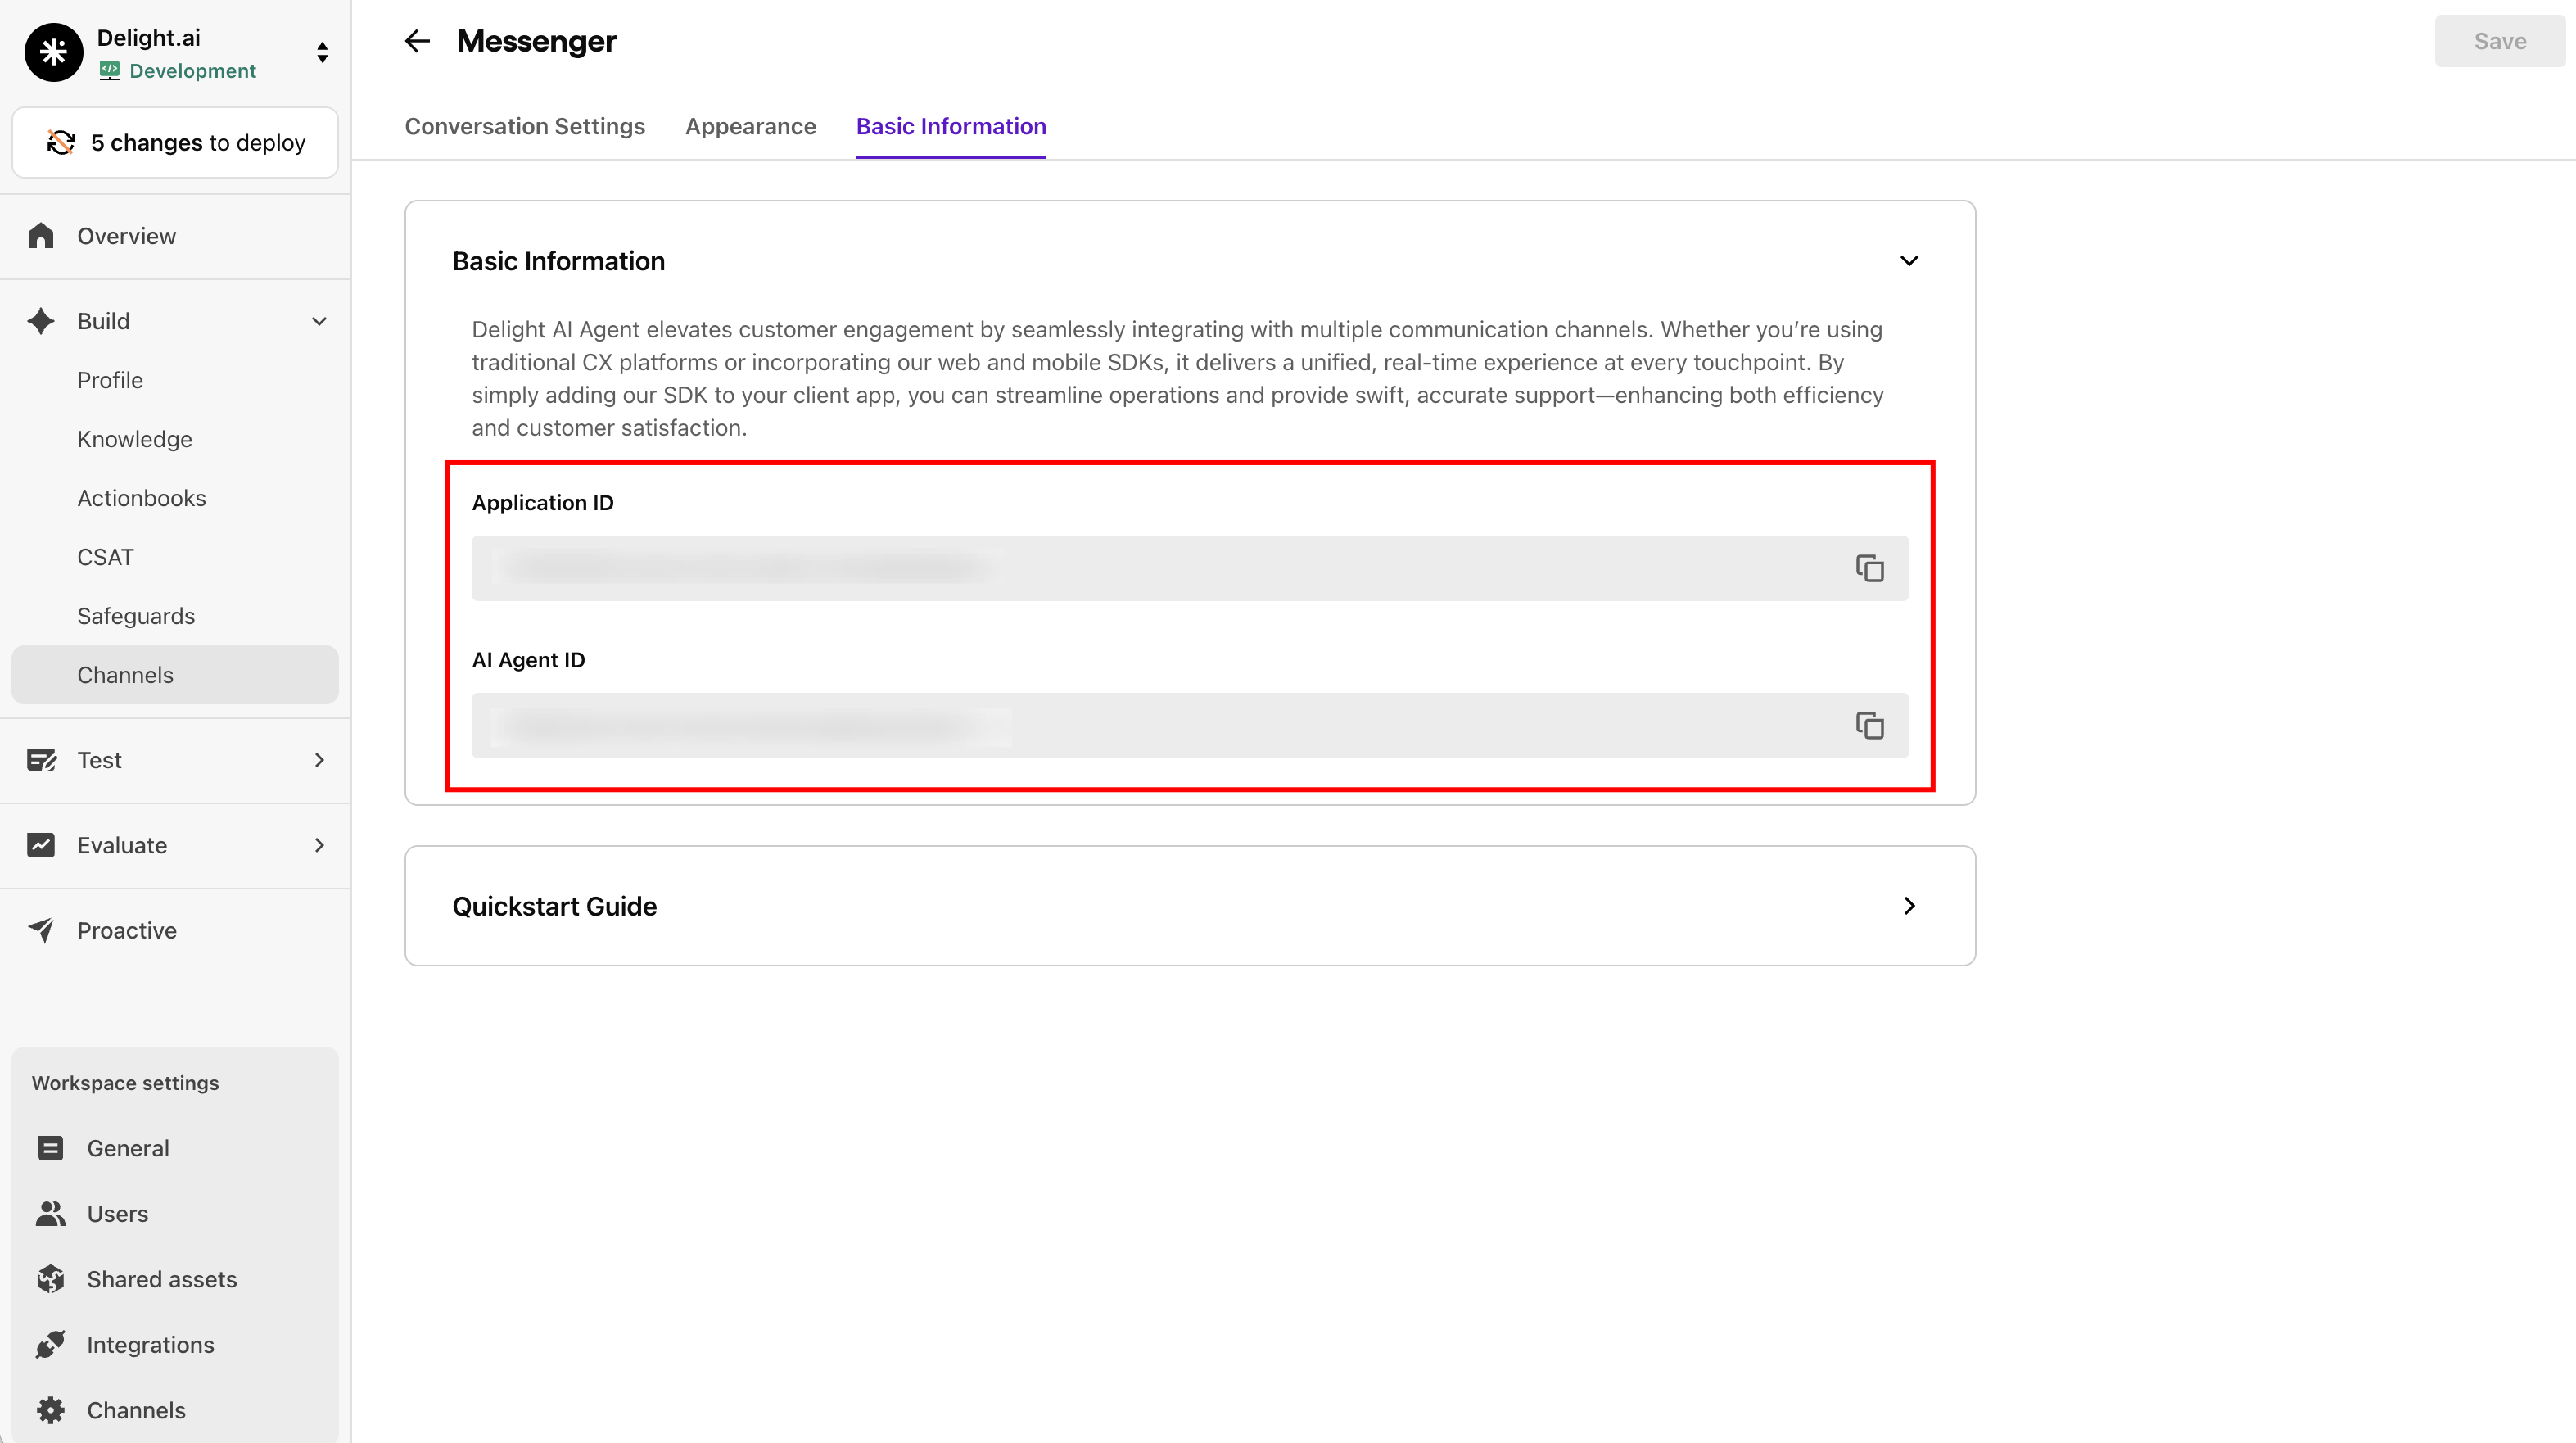
Before you start, you'll need your Application ID and AI Agent ID.
You can find them under the Channels > Messenger menu on the Delight AI dashboard.
System Requirements:
- React >= 18.0.0
- React Native >= 0.80.0
- @sendbird/chat ^4.19.0
- @react-native-clipboard/clipboard >= 1.0.0
- react-native-mmkv >= 3.0.0
- react-native-safe-area-context >= 5.0.0
- date-fns >= 4.0.0
Getting started
Quickly install and initialize the AI Agent SDK by following the steps below.
Step 1. Install AI Agent SDK
Install the package with its peer dependencies using npm or yarn:
npm install @sendbird/ai-agent-messenger-react-native @sendbird/chat @react-native-clipboard/clipboard react-native-mmkv react-native-safe-area-context date-fns(Optional) File attachment support:
If file attachment is enabled in your AI Agent settings, install one of the following picker modules:
Option A: Expo modules (Recommended for Expo projects)
npm install expo-image-picker expo-document-pickerOption B: Community modules (for bare React Native projects)
npm install react-native-image-picker @react-native-documents/picker react-native-permissions{% hint style="info" %}
When using react-native-image-picker, you must also install react-native-permissions for camera access.
{% endhint %}
Step 2. Configure native modules
The SDK requires native module configuration. Only mmkv is required; picker modules are optional.
Minimal setup (without file attachment):
import { createMMKV } from 'react-native-mmkv';

const mmkv = createMMKV();

const nativeModules = {
  mmkv,
};
With file attachment support (Expo modules):
import { createMMKV } from 'react-native-mmkv';
import * as ImagePicker from 'expo-image-picker';
import * as DocumentPicker from 'expo-document-picker';

const mmkv = createMMKV();

const nativeModules = {
  mmkv,
  imagePicker: ImagePicker,
  documentPicker: DocumentPicker,
};
With file attachment support (Community modules):
import { createMMKV } from 'react-native-mmkv';
import * as ImagePicker from 'react-native-image-picker';
import * as DocumentPicker from '@react-native-documents/picker';
import * as Permissions from 'react-native-permissions';

const mmkv = createMMKV();

const nativeModules = {
  mmkv,
  imagePicker: ImagePicker,
  documentPicker: DocumentPicker,
  permissions: Permissions, // Required for react-native-image-picker
};
Step 3. Initialize AI Agent SDK
The React Native SDK provides two main approaches for integration:
Option 1: FixedMessenger (Recommended for quick setup)
FixedMessenger provides a predefined UI toolkit with launcher and messenger:
import { AIAgentProviderContainer, FixedMessenger, AnonymousSessionInfo } from '@sendbird/ai-agent-messenger-react-native';

function App() {
  return (
    <AIAgentProviderContainer
      appId={'YOUR_APP_ID'}
      aiAgentId={'YOUR_AI_AGENT_ID'}
      nativeModules={nativeModules}
      userSessionInfo={new AnonymousSessionInfo()}
    >
      <FixedMessenger />
    </AIAgentProviderContainer>
  );
}
Option 2: AIAgentProviderContainer with Conversation (For custom UI implementations)
AIAgentProviderContainer allows for custom UI implementations and component-level integration:
import { AIAgentProviderContainer, Conversation, AnonymousSessionInfo } from '@sendbird/ai-agent-messenger-react-native';
import { View } from 'react-native';

function App() {
  return (
    <AIAgentProviderContainer
      appId={'YOUR_APP_ID'}
      aiAgentId={'YOUR_AI_AGENT_ID'}
      nativeModules={nativeModules}
      userSessionInfo={new AnonymousSessionInfo()}
    >
      <View style={{ flex: 1 }}>
        <Conversation />
      </View>
    </AIAgentProviderContainer>
  );
}
Component overview
FixedMessenger vs AIAgentProviderContainer
Comparison of FixedMessenger and AIAgentProviderContainer
| Feature | FixedMessenger | AIAgentProviderContainer + Conversation |
|---|---|---|
| UI toolkit | Complete UI with launcher and messenger window | Provider for custom UI implementations |
| Window modes | Supports floating and fullscreen | Custom layouts and components |
| Navigation | Includes Conversation and ConversationList navigation | Must combine with conversation components like <Conversation /> |
| Back button | Handles Android back button automatically | Manual implementation required |
| Recommended for | Most use cases | Specific UI layouts or custom components |
Running your application
Now that you have installed and initialized the AI Agent SDK, follow the steps below to run your application.
To launch and display the messenger, implement the code below:
{% hint style="info" %}
Replace YOUR_APP_ID and YOUR_AI_AGENT_ID with your Application ID and AI agent ID which you can obtain from the Delight AI dashboard. To learn how to do so, refer to the prerequisites section.
{% endhint %}
function App() {
  return (
    <AIAgentProviderContainer
      appId={'YOUR_APP_ID'}
      aiAgentId={'YOUR_AI_AGENT_ID'}
      nativeModules={nativeModules}
      userSessionInfo={new AnonymousSessionInfo()}
    >
      <FixedMessenger />
    </AIAgentProviderContainer>
  );
}
FixedMessenger styles
When using the fixed messenger, FixedMessenger.Style allows you to customize its appearance and positioning:
position: Determines which corner of the screen the launcher will appear in. Available options arestart-top,start-bottom,end-top, andend-bottom.margin: Defines the margin around the fixed messenger and its launcher.launcherSize: Defines the size of the launcher button in pixels (width and height are equal).spacing: Defines the spacing between the launcher and the messenger window.
function App() {
  return (
    <AIAgentProviderContainer {...props}>
      <FixedMessenger>
        <FixedMessenger.Style
          position={'end-bottom'}
          launcherSize={56}
          spacing={16}
          margin={{ start: 16, end: 16, bottom: 16, top: 16 }}
        />
      </FixedMessenger>
    </AIAgentProviderContainer>
  );
}
Window modes
FixedMessenger supports two window modes:
floating(default): The messenger appears as a floating window above your app content.fullscreen: The messenger takes up the full screen.
<FixedMessenger windowMode={'fullscreen'} />When using fullscreen mode, you can specify insets:
<FixedMessenger
  windowMode={'fullscreen'}
  fullscreenInsets={{ top: 50, bottom: 34, left: 0, right: 0 }}
/>
Entry points
You can configure which screen appears first when opening the messenger:
Conversation(default): Opens directly to a conversation.ConversationList: Opens to the list of conversations.
<FixedMessenger entryPoint={'ConversationList'} />You can also specify an initial channel URL to open a specific conversation:
<FixedMessenger initialChannelUrl={'sendbird_group_channel_xxx'} />Manage user sessions
The SDK supports two types of user sessions: Manual Session for authenticated users and Anonymous Session for temporary users.
Session types
1. Manual Session (ManualSessionInfo): Use this when you have an authenticated user with a specific user ID and session token.
import { ManualSessionInfo } from '@sendbird/ai-agent-messenger-react-native';

<AIAgentProviderContainer
  appId={'YOUR_APP_ID'}
  aiAgentId={'YOUR_AI_AGENT_ID'}
  nativeModules={nativeModules}
  userSessionInfo={new ManualSessionInfo({
    userId: 'user_id',
    authToken: 'auth_token',
    sessionHandler: {
      onSessionTokenRequired: async (resolve, reject) => {
        try {
          const response = await fetch('new-token-endpoint');
          resolve(response.token);
        } catch (error) {
          reject(error);
        }
      },
      onSessionClosed: () => { },
      onSessionError: (error) => { },
      onSessionRefreshed: () => { }
    }
  })}
>
  <FixedMessenger />
</AIAgentProviderContainer>
2. Anonymous Session (AnonymousSessionInfo): Use this when you don't have user authentication or want to allow guest access. The server will automatically create a temporary user.
import { AnonymousSessionInfo } from '@sendbird/ai-agent-messenger-react-native';

<AIAgentProviderContainer
  appId={'YOUR_APP_ID'}
  aiAgentId={'YOUR_AI_AGENT_ID'}
  nativeModules={nativeModules}
  userSessionInfo={new AnonymousSessionInfo()}
>
  <FixedMessenger />
</AIAgentProviderContainer>
Authentication
You can manually control user authentication using useMessengerSessionContext. Call authenticate() before showing the messenger to avoid loading delays.
import { useMessengerSessionContext } from '@sendbird/ai-agent-messenger-react-native';

const App = () => {
  const { authenticate, sdkUser } = useMessengerSessionContext();

  useEffect(() => {
    authenticate();
  }, []);

  return <FixedMessenger />;
};
Deauthentication
To log out the current user, call deauthenticate(). This disconnects the user session and clears the authentication state.
import { useMessengerSessionContext } from '@sendbird/ai-agent-messenger-react-native';

const LogoutButton = () => {
  const { deauthenticate } = useMessengerSessionContext();

  const handleLogout = () => {
    deauthenticate();
  };

  return <Button title={'Logout'} onPress={handleLogout} />;
};
Advanced features
The following are available advanced features.
Customizing theme
You can customize the messenger theme by passing a theme prop to AIAgentProviderContainer.
<AIAgentProviderContainer
  appId={'YOUR_APP_ID'}
  aiAgentId={'YOUR_AI_AGENT_ID'}
  nativeModules={nativeModules}
  userSessionInfo={new AnonymousSessionInfo()}
  theme={{
    mode: 'dark', // 'light' or 'dark'
    typography: {
      h1: { fontSize: 24, fontWeight: '700' },
      body1: { fontSize: 16, fontWeight: '400' },
    },
  }}
>
  <FixedMessenger />
</AIAgentProviderContainer>
Display messenger without launcher button
Build custom messenger UI using AIAgentProviderContainer with Conversation directly:
import { AIAgentProviderContainer, Conversation, AnonymousSessionInfo } from '@sendbird/ai-agent-messenger-react-native';
import { View } from 'react-native';

function App() {
  return (
    <View style={{ flex: 1 }}>
      <AIAgentProviderContainer
        appId={'YOUR_APP_ID'}
        aiAgentId={'YOUR_AI_AGENT_ID'}
        nativeModules={nativeModules}
        userSessionInfo={new AnonymousSessionInfo()}
      >
        <Conversation />
      </AIAgentProviderContainer>
    </View>
  );
}
Passing context object to agent
You can predefine customer-specific information such as country, language, or other custom context data to guide the AI agent in providing faster and more accurate responses.
This allows for a more personalized and context-aware interaction experience.
{% hint style="warning" %} These settings can only be configured during initialization. {% endhint %}
<AIAgentProviderContainer
  appId={'YOUR_APP_ID'}
  aiAgentId={'YOUR_AI_AGENT_ID'}
  nativeModules={nativeModules}
  userSessionInfo={new AnonymousSessionInfo()}
  // Language setting (IETF BCP 47 format)
  language={'en-US'}
  // Country code setting (ISO 3166 format)
  countryCode={'US'}
  // Context object for the AI Agent
  context={{
    userPreference: 'technical',
    customerTier: 'premium',
  }}
>
  <FixedMessenger />
</AIAgentProviderContainer>
Localization and language support
The SDK supports multiple languages and allows you to customize UI strings. You can:
- Set the language during initialization
- Customize specific strings in supported languages
- Add support for additional languages
Supported languages: German (de), English (en), Spanish (es), French (fr), Hindi (hi), Italian (it), Japanese (ja), Korean (ko), Portuguese (pt), Turkish (tr)
Example of customizing strings:
<AIAgentProviderContainer
  appId={'YOUR_APP_ID'}
  aiAgentId={'YOUR_AI_AGENT_ID'}
  nativeModules={nativeModules}
  userSessionInfo={new AnonymousSessionInfo()}
  language={'ko-KR'}
  strings={{
    conversation: {
      input_placeholder: '질문을 입력하세요...',
    },
  }}
>
  <FixedMessenger />
</AIAgentProviderContainer>
To learn more about localization options and the full list of available string sets, refer to the Localization guide.